Our Favorite Houseplant Products for Guaranteed Success
Tried-and-True Tools Every Indoor Gardener Needs
Whether you’re just starting your houseplant journey or your living room is a lush jungle of leafy greens, having the right tools makes all the difference. At our garden center, we’ve tested and trusted a variety of products over the years—and we’re sharing our go-to favorites that help houseplants not only survive but truly thrive.
Here’s a roundup of our top houseplant products that set you (and your plants!) up for success:
🌱 1. The Right Soil Matters – Coco Loco & Sol Soils Chunky Mix
A plant is only as healthy as the soil it’s rooted in. That’s why we’re picky about what we recommend—and these two mixes are the cream of the crop.
Coco Loco by FoxFarm
Our go-to for most houseplants, Coco Loco is a rich, coconut coir-based mix that holds just the right amount of moisture without becoming soggy. It’s loaded with beneficial ingredients like earthworm castings and bat guano (yes, really!) for a light, fluffy texture and nutrient-rich environment.
Perfect for: Snake Plants, ZZ Plants, Peace Lilies, Spider Plants, and more.
Sol Soils Houseplant Chunky Mix
This specialty blend is a must-have for aroids and epiphytic plants that crave airflow around their roots. It’s made with chunky bark, pumice, and coconut husk to mimic the natural environments of rainforest dwellers like Monsteras and Hoyas.
Perfect for: Monstera, Philodendron, Hoya, Pothos, Anthurium, and even Christmas Cactus.
Why we love them both:
Together, these two mixes cover just about every houseplant in your collection. If you’re not sure which one is right, just ask—we’re happy to help match the mix to your plant’s personality.
💧 2. Moisture Meter – No More Guesswork!
If you’ve ever killed a plant by loving it a little too much, a moisture meter is a must. It takes the guesswork out of watering and helps you avoid root rot or crispy leaves.
Why we love it:
Just stick it in the soil and get an instant reading. No batteries, no fuss. It’s one of the best tools for learning each plant’s unique watering needs.
Perfect for: New plant parents, or anyone with finicky tropicals like Calatheas or Alocasias.
🌿 3. Leaf Shine & Insect Control – Bonide Neem Oil Spray
Healthy leaves are happy leaves. Neem oil is a natural and effective solution that both cleans foliage and helps prevent or treat common pests like spider mites, mealybugs, and aphids.
Why we love it:
It’s organic, multipurpose, and safe for indoor use. Plus, it gives leaves a subtle, healthy glow without clogging pores.
Perfect for: All houseplants, especially ferns, ivy, and other bug-prone varieties.
🪴 4. The Right Container – Pots with Drainage + Stylish Cachepots
Drainage is non-negotiable. A pretty pot without a drainage hole is a recipe for disaster—but that doesn’t mean you have to sacrifice style.
Why we love it:
We carry a curated selection of pots with built-in drainage and chic outer cachepots so you get both function and beauty. Just lift the inner pot to check for moisture or let excess water drain, then slip it back into the decorative cover.
Perfect for: Customers who want a seamless look without plant drama.
🌸 5. Feed for Success – Jack’s Houseplant Special Fertilizer (15-30-15)
During the active growing season, most houseplants benefit from a steady supply of nutrients to support lush growth and vibrant color. Our top pick? Jack’s Houseplant Special Fertilizer—a balanced, water-soluble formula trusted by professionals and home growers alike.
Why we love it:
This 15-30-15 blend is easy to mix, gentle on roots, and packed with essential nutrients to encourage strong stems, healthy foliage, and even blooming in flowering houseplants. It’s especially great for indoor conditions where plants aren’t getting nutrients from outdoor elements.
Perfect for:
Peace Lilies, Pothos, Philodendrons, Spider Plants, Orchids, and more.
How to use it:
Just mix with water and feed every 2–4 weeks during spring and summer. For best results, always water thoroughly and apply to moist soil.
Pro tip:
Consistency is key—regular feeding leads to stronger, more resilient plants with fewer issues. It’s one of the easiest ways to keep your indoor jungle looking vibrant year-round.
🧼 6. ARS Snips
Cleaning up yellowed leaves or giving your plant a shape-up is part of good plant care. Dull scissors can crush stems and introduce disease, so a sharp, dedicated pair is essential.
Why we love it:
We stock soft-grip snips and bypass pruners that are small enough to maneuver between leaves but tough enough for thick stems.
Perfect for: Monstera, Philodendron, Spider Plants, or any houseplant in need of a refresh.
💚 7. Humidity Helpers – Pebble Trays & Mini Misters
Many houseplants hail from tropical regions and appreciate extra humidity. But if a whole-room humidifier feels like overkill, a few small accessories can go a long way.
Why we love it:
Pebble trays are low-maintenance: just fill the tray with water and sit your plant on top (not in the water) to increase ambient moisture. Pair with a fine-mist sprayer for quick refreshes on dry days.
Perfect for: Ferns, Calatheas, Prayer Plants, and orchids.
🪴 8. Sticky Traps – A Simple Solution for Fungus Gnats
Fungus gnats can pop up any time you have moist soil, but sticky traps help break the life cycle fast—no sprays required.
Why we love it:
These discreet yellow traps are safe for use around kids and pets, and they catch gnats quickly before they can lay more eggs in your soil.
Perfect for: Any plant in a consistently moist environment.
🐛 9. Long-Term Pest Protection – Bonide Systemic Houseplant Insect Control
While foliar sprays like neem oil are great for spot-treating pests, sometimes you need extra protection from the inside out. That’s where Bonide Systemic Houseplant Insect Control comes in.
Why we love it:
It’s a granular treatment that you mix into the top layer of soil and water in. The active ingredient is absorbed by the roots and works from within to control pests like fungus gnats, mealybugs, aphids, whiteflies, and more—for up to 8 weeks.
Perfect for:
Orchids, Peace Lilies, Palms, Snake Plants, and any plant that’s prone to recurring pest problems or lives in consistently moist soil.
Pro tip:
Use it as a preventive measure during spring and summer, when pest activity is at its peak. It’s especially helpful for customers who don’t want to spray or those dealing with persistent infestations.
💡 Bonus: Grow Lights for Low-Light Rooms
Don’t let shady corners stop you from growing plants. We carry sleek, energy-efficient grow lights that can supplement natural light in darker rooms or boost growth during winter months.
Why we love it:
Our most popular styles blend into home décor and clip easily onto shelves or stands—no ugly industrial setups required.
Perfect for: ZZ Plants, Snake Plants, and Succulents needing a little extra help.
Ready to Grow Like a Pro?
All of these houseplant helpers are available right here at the garden center—just ask one of our plant specialists to help you get set up. Whether you’re building a windowsill oasis or maintaining your growing collection, these trusted products will help you grow with confidence.
Need a custom potting mix blend? Want a plant diagnosis? We’re here to help—because houseplants shouldn’t be hard. They should be joyful.


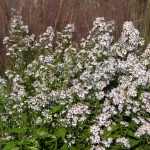 for native bees, it brings life and movement to your landscape just when many plants are fading. Wood Aster naturalizes easily beneath trees, adds charm to borders, and thrives along woodland edges. Its airy blooms also make a beautiful, long-lasting filler for autumn flower arrangements.