Monthly Archives: March 2024

Cultivating Creeping Phlox

Introducing Creeping Phlox: The Perfect Ground Cover for Your Garden!

Are you looking for a stunning, low-maintenance ground cover to transform your garden? Look no further than Creeping Phlox! With its vibrant colors, easy care, and versatility, Creeping Phlox is a must-have for any garden enthusiast.

Benefits:

  1. Beautiful Blooms: Creeping Phlox boasts clusters of colorful flowers that bloom profusely in spring, creating a breathtaking carpet of color.
  2. Low Maintenance: Once established, Creeping Phlox requires minimal maintenance, making it ideal for busy gardeners.
  3. Drought Tolerant: Thriving in dry conditions, Creeping Phlox is perfect for gardens in need of a water-wise solution.
  4. Attracts Pollinators: Bees, butterflies, and other pollinators are drawn to the nectar-rich flowers of Creeping Phlox, making it an Eco-friendly choice.
  5. Erosion Control: With its dense, spreading growth habit, Creeping Phlox effectively prevents soil erosion on slopes and embankments.

Uses:

  • Ground Cover: Fill in bare spots in your garden with a lush carpet of Creeping Phlox.
  • Rock Gardens: Add a pop of color to rock gardens or alpine landscapes with Creeping Phlox.
  • Borders and Edges: Create defined borders or soften the edges of pathways with the trailing foliage of Creeping Phlox.
  • Containers: Plant Creeping Phlox in containers or hanging baskets for a cascading display of color on your patio or balcony.

Cultivation Tips:

  • Sunlight: Plant Creeping Phlox in a location with full sun to partial shade for optimal blooming.
  • Soil: Ensure well-drained soil with a neutral to slightly alkaline pH.
  • Watering: Water newly planted Creeping Phlox regularly until established, then water sparingly during dry spells.
  • Pruning: Trim back spent flowers after blooming to encourage a neat appearance and promote future growth.
  • Propagation: Easily propagate Creeping Phlox by division in spring or early fall.

Companion plants: Bulbs: Daffodils, Crocus, Tulips, Daylilles, Catmint, Coneflowers

Don’t miss out on the beauty and benefits of Creeping Phlox! Visit us today to add this versatile ground cover to your garden and watch it thrive year after year.

Creeping Phlox a Garden Marvel

Unveiling the Beauty of Creeping Phlox: A Garden Marvel

In the realm of garden wonders, few plants rival the sheer splendor and versatility of Creeping Phlox. With its cascading blooms and effortless charm, Creeping Phlox has earned its place as a beloved favorite among gardeners worldwide. Join us as we delve into the enchanting world of Creeping Phlox and uncover the secrets to incorporating this botanical gem into your outdoor sanctuary.

A Symphony of Color: One cannot help but be captivated by the breathtaking display of color offered by Creeping Phlox. From delicate shades of pink and lavender to vibrant hues of purple, blue, and white, these dainty flowers paint the landscape with a mesmerizing palette that heralds the arrival of spring. Whether spilling over rock walls, carpeting garden beds, or adorning containers, Creeping Phlox adds an irresistible allure to any setting.

Unmatched Versatility: One of the most remarkable attributes of Creeping Phlox is its unparalleled versatility. This hardy perennial thrives in a variety of conditions, from sunny garden borders to partly shaded woodland nooks. Whether utilized as a ground cover to suppress weeds and prevent erosion or as a captivating accent in rock gardens and alpine landscapes, Creeping Phlox adapts effortlessly to its surroundings, lending its ethereal beauty to any space.

Easy-Care Elegance: Gardeners rejoice in the low-maintenance nature of Creeping Phlox, which requires minimal fuss to thrive. Once established, this resilient plant demands little more than occasional watering and light pruning to maintain its vigor and charm. Drought-tolerant and resistant to pests and diseases, Creeping Phlox proves itself to be a resilient companion in the ever-changing tapestry of the garden landscape.

A Haven for Pollinators: Beyond its aesthetic appeal, Creeping Phlox plays a vital role in supporting pollinators such as bees, butterflies, and hummingbirds. The nectar-rich blooms of Creeping Phlox serve as an irresistible source of sustenance for these winged visitors, ensuring a thriving ecosystem teeming with life and vitality. By welcoming Creeping Phlox into your garden, you contribute to the preservation of biodiversity and the delicate balance of nature.

Cultivating Creeping Phlox: For those eager to welcome Creeping Phlox into their garden sanctuary, success awaits with a few simple guidelines. Choose a well-drained location with ample sunlight, and prepare the soil with organic matter to promote healthy growth. Water regularly, especially during periods of drought, and provide occasional fertilization to encourage robust blooms. With proper care and attention, Creeping Phlox will reward you with a spectacle of color that will endure for years to come.

As we celebrate the beauty and resilience of Creeping Phlox, we invite you to embark on a journey of discovery in your own garden oasis. Embrace the elegance and charm of this botanical treasure, and revel in the transformative power of nature’s wonders. With Creeping Phlox as your guide, your garden will flourish with a tapestry of color and vitality, creating a sanctuary of serenity and splendor for all to enjoy.

Discover the Perennial Epimedium (Barrenwort)!

Discover the Beauty of Epimedium!

Transform your garden into a paradise with the captivating allure of Epimedium, also known as Barrenwort. Renowned for its delicate beauty and resilience, Epimedium is a must-have perennial for any garden enthusiast. Here’s why:

Unrivaled Elegance: Admire the exquisite heart-shaped foliage that adorns Epimedium, creating an enchanting carpet of greenery. In spring, delicate sprays of dainty flowers emerge, adding a touch of ethereal charm to your landscape.

Versatile and Vigorous: Whether gracing shady borders, woodland gardens, or rockeries, Epimedium thrives in a variety of conditions. Its adaptability and vigor make it a standout performer, effortlessly enhancing any outdoor space.

Low-Maintenance Wonder: Say goodbye to high-maintenance plants! Epimedium requires minimal care once established, allowing you to sit back and enjoy its enduring beauty year after year. Perfect for busy gardeners seeking effortless elegance.

Attracts Pollinators: Embrace nature’s symphony as Epimedium beckons butterflies and other pollinators to your garden. Enhance biodiversity and create a haven for beneficial insects with this pollinator-friendly perennial.

Long-lasting Beauty: With its long flowering period and evergreen foliage, Epimedium provides year-round interest, making it a wise investment for any garden landscape. Enjoy its enduring beauty across the seasons.

Visit our nursery and explore our wide selection of Epimedium varieties. From classic favorites to rare cultivars!

Epimedium: Barrenwort Cultivation Guide

To cultivate Epimedium, follow these steps:

  1. Choose the Right Location: Epimedium thrives in partial to full shade and well-drained soil rich in organic matter. Select a spot with dappled sunlight or morning sun and afternoon shade.
  2. Prepare the Soil: Ensure the soil is loose, well-drained, and slightly acidic to neutral pH (around 6.0 to 7.0). Incorporate compost or aged manure to improve soil structure and fertility.
  3. Planting: Plant Epimedium in early spring or fall. Dig a hole twice as wide as the root ball and deep enough to accommodate it. Place the plant in the hole, backfill with soil, and water thoroughly.
  4. Watering: Keep the soil consistently moist but not waterlogged, especially during the plant’s first growing season. Once established, Epimedium is relatively drought-tolerant.
  5. Mulching: Apply a layer of organic mulch, such as shredded bark or compost, around the base of the plant to retain soil moisture and suppress weeds. Maintain a mulch depth of 2-3 inches, but avoid mulch touching the plant’s stems.
  6. Fertilizing: Feed Epimedium with a balanced, slow-release fertilizer in early spring before new growth emerges. Avoid high-nitrogen fertilizers, as they can encourage excessive foliage growth at the expense of flowers.
  7. Pruning: Trim back any dead or damaged foliage in late winter or early spring before new growth appears. This helps promote a tidy appearance and encourages vigorous growth.
  8. Division: Every few years, divide mature clumps of Epimedium to rejuvenate the plant and prevent overcrowding. Dig up the clump, carefully separate the rhizomes, and replant the divisions in prepared soil.
  9. Pest and Disease Control: Epimedium is generally pest and disease-resistant, but occasional issues like aphids or slugs may occur. Monitor plants regularly and treat any infestations promptly with appropriate methods, such as insecticidal soap or handpicking.
  10. Winter Care: Epimedium is winter-hardy in most climates, but providing a layer of winter mulch can offer additional protection in colder regions. Avoid excessive moisture around the roots during winter to prevent rot.

By following these cultivation guidelines, you can enjoy healthy, thriving Epimedium plants in your garden year after year.

Getting More Harvest out of Small Spaces!

Getting More Harvest out of Small Spaces!

Growing more food in less space is so easy to do with a little bit of planning! Take time to think out what you would like to grow (i.e., what your family eats most of) and then create yourself a calendar of what and when you are sowing or planting out seedlings. Follow these tips and tricks so you can grow more tasty food in less space which usually means less effort too!

A good foundation for a bountiful harvest starts with good nutrient rich soil. Vegetable crops are heavy feeders and will produce less if they are lacking in nutrients. We recommend topping garden beds with Bumper Crop yearly or incorporating the compost in at time of planting seedlings. Extra heavy feeders such as Tomatoes will also benefit from a monthly application of organic Tomato-tone or Garden-tone.

  1. Spacing is one old rule that should be thrown out the window. Seed packets often talk about rows and while this is useful with big gardens it’s a waste of space in small gardens or raised beds. It is much more space efficient to plant in “bed” formations and skip l rows. Also, when seed packets recommend a certain spacing it is referring to on center planting. For example, if they suggest 8” spacing that really means the plant needs 4” on each side. So, while you may be placing a plant and then measuring 8” until you plant the next really you should be measuring just 4”. By following on center planting this immediately gets you double the number of plants! Close spacing is also helpful since the plants will shade the soil which is healthier for the soil but also will help the soil retain more moisture.
  2. Intercropping is the act of cultivating different crops in the same space at the same time, a great example is: growing peas on a teepee while lettuce can be grown in the center and will enjoy the shade in the hotter months. Other great examples include tucking in basil around tomatoes, carrots with lettuce or onions among your cabbage. Intercropping can also help prevent pests since the different scents of plants mixed together make it harder to find the plant they want to attack!
  3. Succession planting is another important practice when growing more food in less space. It usually takes a little bit of planning but is the key to ensuring an abundant harvest from a small garden. With succession planting, you enjoy multiple harvests from a single patch of ground in any given growing season. This is done by planting one crop immediately after an earlier crop has finished to keep the harvests coming. In March through May we can grow cool season crops then as they finish transition to warm season crops and then in fall switch back to cool season crops.
  4. Season Extenders are cold frames, row covers, and hot beds to allow your garden to produce earlier and later into the season therefore allowing you to grow more in your small space. Cold frames can be purchased or thrifted by using old windows. Row covers can be lighter weight fabric or heavy-duty plastic. Hotbeds are warm growing environments created using the heat that’s given off during the decomposition of organic matter such as manure.A quick YouTube search will help you build your own!
  5. Growing Vertically is a fabulous way to get more vegetables out of a small garden! By utilizing Trellises, Teepees, Stakes and Arbors you can train vegetables such as Pole Beans, Peas, Cucumbers, Tomatoes, Squash and Melons vertically. This allows you to plant more around the bases of these vegetables. Think out of the box, even zucchini can be trained to grow more vertically with a tomato cage!
  6. Varieties of vegetables you grow can also impact your harvest size. While heirloom vegetables tend to have more flavor, they typically won’t produce as big of harvests compared to hybrid vegetables. It can also be helpful to choose dwarf varieties so that you can fit more vegetables into your small garden. When choosing seeds also take a look at days to maturity, when possible, pick faster maturing varieties so that you can have more succession planting!
  7. Regular harvesting can help to encourage more growth and higher yields. Many vegetables especially beans and peas will stop forming new flowers if pods are left too long on the plant. Even tomatoes and peppers benefit from regular harvesting because taking off the fruit or vegetable allows the plant to direct its’s energy into producing more. Be sure to harvest your crops as soon as they are ready to prevent them from becoming overripe or spoiling.

A St. Patrick’s Day Tale of a Little Girl Looking for Luck

In the heart of a cozy village named Cloverdale, a spirited little girl named Rosie found herself enchanted by the tales of leprechauns and pots of gold. As St. Patrick’s Day approached, she decided to embark on her own adventure to capture a bit of Irish luck.

One sunny afternoon, Rosie skipped into the local garden shop, her eyes wide with curiosity. The sweet chime of a bell announced her arrival, and Mrs. Murphy, the kind elderly owner, greeted her with a warm smile.

“Hello there, Rosie! What brings you to my little green haven?” Mrs. Murphy asked.

With a twinkle in her eye, Rosie replied, “I’m on a mission to find a special Shamrock plant for St. Patrick’s Day!”

Mrs. Murphy chuckled, leading Rosie to a corner filled with pots of Shamrocks. Each one seemed to beckon with a promise of magic. Rosie carefully inspected them, her small fingers tracing the delicate leaves.

“Ah, this one,” she exclaimed, pointing to a particularly charming Shamrock with vibrant green leaves shaped like tiny hearts.

Mrs. Murphy grinned, “Good choice, Rosie! They say Shamrocks bring good luck and happiness.”

With the Shamrock cradled in her arms, Rosie skipped home, her heart dancing with joy. She named her new friend “Lucky” and placed it by her bedroom window, where it could bask in the sunlight.

As St. Patrick’s Day dawned, Rosie and Lucky shared secrets and giggles. Rosie even swore she heard the Shamrock whisper tales of leprechauns and hidden treasures. Together, they crafted colorful paper rainbows, adorned with glittering gold coins, turning Rosie’s room into a magical haven.

That evening, Rosie fell asleep with dreams of dancing leprechauns and pots of gold. As she slumbered, Lucky continued to sway gently in the moonlit room, casting a soft, green glow.

In the morning, Rosie awoke to a delightful surprise. A tiny, glittering shamrock charm lay beside her bed, a gift from her newfound friend. She hugged Lucky tightly, grateful for the enchanting St. Patrick’s Day adventure they had shared.

From that day forward, Rosie and Lucky remained inseparable. In Cloverdale, the tale of a little girl and her Shamrock became a cherished story, a reminder that sometimes, the smallest moments can bring the most magical memories.

Cultivating Oxalis

  1. Light: INDOORS: Place your Shamrock plant in bright, indirect light. It prefers filtered sunlight and can tolerate some direct morning sun. OUTDOORS: Place in part to full shade, if in fuller sun don’t allow plant to dry out.
  2. Watering: Keep the soil consistently moist but not waterlogged. Water when the top inch of soil feels dry. Reduce watering during the dormant period, typically in winter.
  3. Soil: Use well-draining potting mix our favorite for this would be Coco Loco by Foxfarms.
  4. Temperature: Maintain temperatures between 60-75°F (15-24°C). Shamrocks prefer cool conditions, especially during their dormant period.
  5. Humidity: Normal room humidity is usually sufficient. If your home is very dry, consider placing a tray of water near the plant or using a humidifier. Outdoors you don’t have to worry about the humidity.
  6. Fertilizing: Feed the plant with a balanced, water-soluble fertilizer every 4-6 weeks during the growing season (spring and summer). Jacks Classic 20-20-20 is perfect! Avoid fertilizing during dormancy.
  7. Dormancy: Shamrock plants may go dormant for a few months in winter. During this period, reduce watering and stop fertilizing. New growth will resume when the plant comes out of dormancy.
  8. Containers: Choose a pot with drainage holes to prevent waterlogging. Repot every 1-2 years or when the plant outgrows its container.
  9. Pruning: Trim off any yellow or damaged leaves regularly. This encourages new, healthy growth.
  10. Pests and Diseases: Keep an eye out for pests like spider mites or aphids. Treat any issues promptly with insecticidal soap or neem oil.

Embracing the Charm of Shamrock Plants (Oxalis)

Embracing the Charm of Oxalis

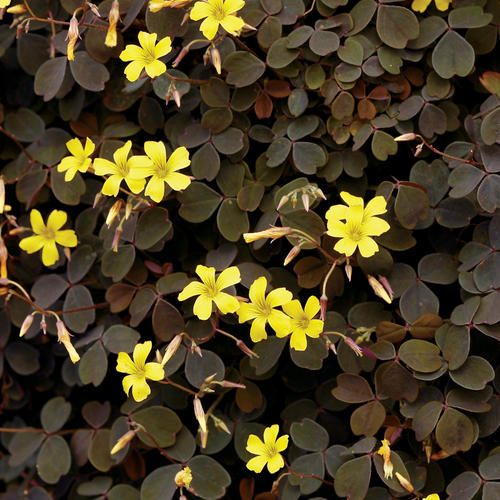
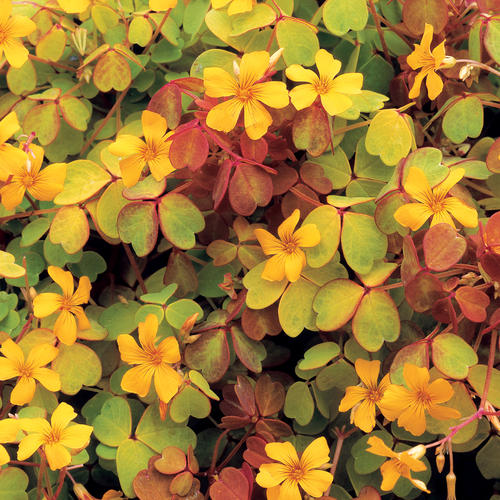
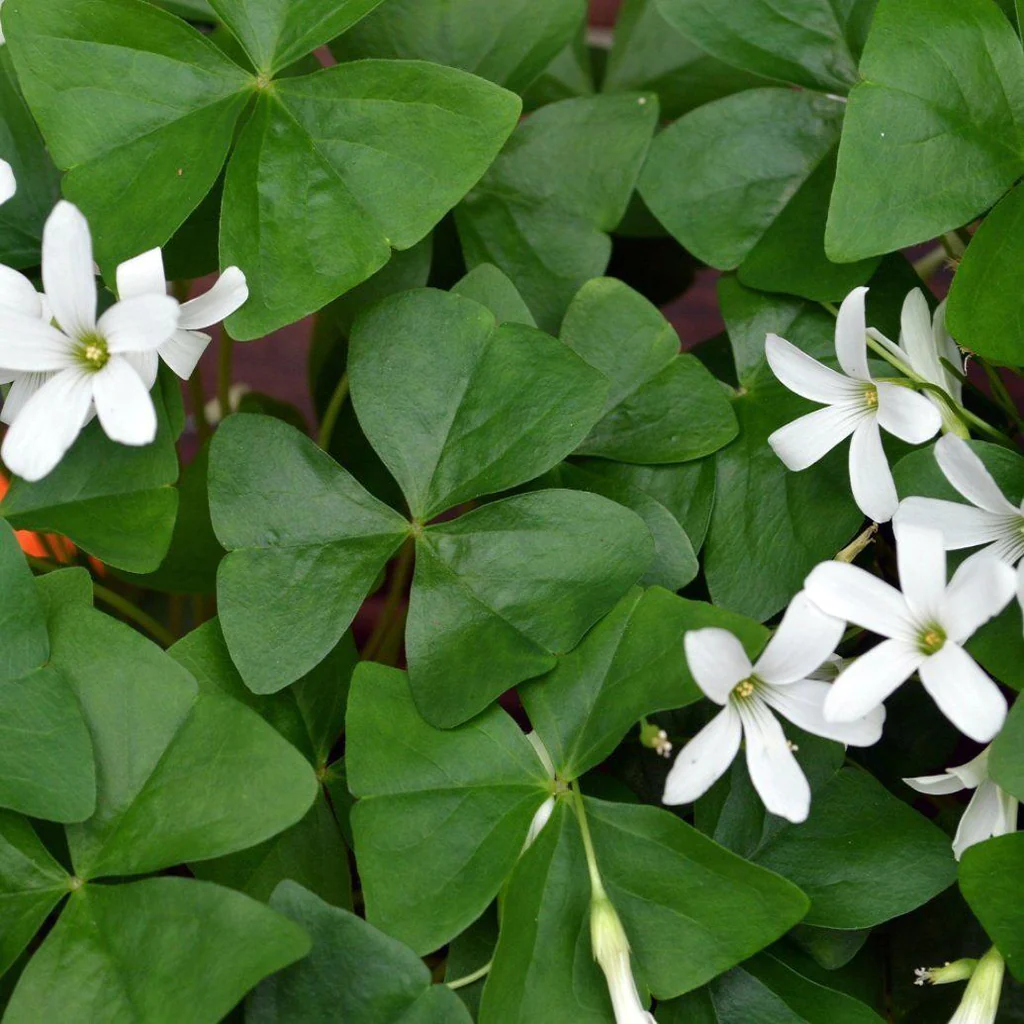
In the realm of houseplants, there exists a gem that not only graces our living spaces with its beauty but also symbolizes luck and prosperity. Meet the Shamrock Plant aka Oxalis plant, a delightful addition to any indoor oasis or outdoor garden, particularly thriving in warmer climates. Whether you’re a seasoned green thumb or just beginning your journey into the world of gardening, embracing the charm of Oxalis promises to fill your surroundings with boundless joy.

Bringing Luck to your Home

For those seeking to cultivate a vibrant indoor sanctuary, the Oxalis plant proves to be an invaluable companion. Its delicate, clover-like leaves come in an array of hues, from rich emerald greens to striking purples, adding a splash of color to any room. Placed in a sunny spot near a window, the Oxalis thrives, basking in the gentle warmth of natural light.

But it’s not just its visual appeal that makes the Oxalis a beloved houseplant. Its care is delightfully simple, making it an ideal choice for both experienced plant parents and newcomers alike. With consistent watering and well-draining soil, coupled with occasional fertilization during the growing season, your Oxalis will flourish, gracing your home with its graceful presence.

Photo Courtesy Proven Winners
‘Zinfandel’ Oxalis

Outdoor Splendor

As the temperatures rise and the sun bathes the earth in its golden glow, the Oxalis plant can make its debut outdoors. May through September Shamrock plants thrive in garden beds, rock gardens or in containers on patios and balconies.

Planting Oxalis outdoors invites a sense of whimsy and enchantment to your garden landscape. Its delicate foliage dances in the breeze white its dainty flowers bloom in shades of pink, white or yellow, attracting bees and butterflies to partake in its beauty.

Much like its indoor counterpart, caring for outdoor Oxalis is a breeze. Ensure it receives appropriate sunlight, well-draining soil, and regular watering, allowing it to flourish and spread its luck throughout your outdoor oasis.

Cultivating Joy with Shamrocks

Pick up a Shamrock plant this week to bring luck into your home! Enjoy its vibrant colors on your kitchen counter or in a window sill and then later when the weather warms transplant it into your landscape or into a mixed garden container! You will be sure to enjoy its resilient nature and effortless charm which will serve as a reminder to embrace life’s beauty.

Photo Courtesy Proven Winners
‘Molten Lava’ Oxalis