Author Archives: D.R. Snell Nursery

Beetle Mania

It’s hard to forget the years that we’ve been plagued with Japanese beetles. These ravenous creatures can destroy your lawn, garden and good nature in one season by eating away precious time and money invested in our landscapes. As they know no boundaries, Japanese beetle control methods are most effective if neighborhoods band together in their efforts. So, rally the troops! 

Identification & Damage 

Japanese beetles are a problem at two stages of their life cycle: larvae and adult. The larvae, called grubs, are actively feeding from August through October and again in April through May. It is during this time that the grubs are closest to the soil surface feasting on plant roots, especially grass roots. A heavy grub population will result in dead patches of turf that can be lifted like a carpet. Japanese beetle grubs are 1 ½” long, C-shaped and white with a brown head. When gardening, you will almost always find some grubs in the soil. Small populations of grubs can be present in the soil without significant damage to the lawn. If you notice more than a dozen per square foot, however, this constitutes a problem that should be dealt with. 

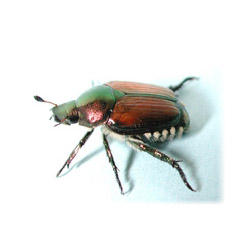
Adult Japanese beetles have a hard-shell body that is about ½ inch long. They are metallic-green and copper-colored. At this stage, beetles can decimate a plant in record time by skeletonizing the leaves – nibbling off all the foliage between the veins. Adult beetles start to emerge from the soil with a frenzy of feeding, mating and laying eggs. You will find adults feeding in groups in full sun, and they feed on over 300 different species of plants. These insects maintain this frantic level of activity through the first half of August. The females lay their eggs on the ground. When the eggs hatch they dig their way into the soil to feast on plant roots in preparation for winter. As soil temperatures decrease the larvae move deeper into the soil only to resurface and feed on plant roots again in spring. 

Beetle Control Methods 

There are several methods to control both Japanese beetle grubs and adults, some environmentally-friendly and some more harshly chemical. Always read pest control labels in their entirety even if they are listed as organic or environmentally-friendly. These labels are meant for the protection of you, your plants and the planet. 

Environmentally-Friendly Adult Beetle Control 

Effective options for controlling adult Japanese beetles with the least harm to plants and the landscape include… 

  • Manual Removal – Pick off and destroy the feeding adults even if you see just a few. Japanese Beetles produce pheromones that will attract many more to your property, so it is best to pick them off and destroy them right away.
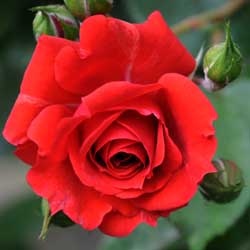
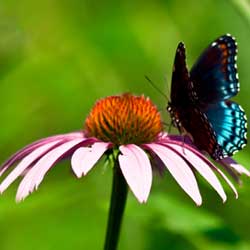
  • Use Non-Attractive Plants – If you have a shade garden you will not have a problem with Japanese Beetles. In sunny areas, choose plants that beetles don’t like.
  • Trap – Pheromone traps lure adult beetles, sometimes hundreds a day, and trap them in a disposable bag. Replace the bag as necessary. Place trap at least 20 feet from the plantings that you are trying to protect to lure the beetles away.
  • Row Covers – Floating row covers of reemay fabric may be placed over plants to avoid beetle damage by keeping the beetles from accessing the plants.
  • Pyrethrins – These insecticides are naturally derived from the pyrethrum daisies. Pyrethrins attack the insect’s central nervous system, producing a rapid knockdown. The residual effect, however, is only 5 days, so several applications may be needed to control severe infestations.
  • Insecticidal Soap – This soap is a contact kill with no residual control, but can be useful for smaller infestations or few beetles.
  • Neem Oil – This oil is an organic control that repels Japanese beetles. Spray early in morning or on an overcast day. Because neem is an oil, you may burn plant leaves if spraying in full sun. 

Chemical Adult Beetle Controls 

When using any chemical controls, read the product label completely and follow application instructions meticulously. It is a good idea to use a spreader sticker so that the chemical will adhere to the plant for the greatest effect. Popular chemical options to control adult Japanese beetles include… 

  • Sevin – This chemical is absorbed through the skin and will kill beetles on contact. It has a 7-10 day residual effect but must be reapplied after a rain. Consult label for recommended time that fruit and vegetables may be consumed after application.
  • Pyrethroides – Synthetic pyrethrin-like insecticides kill on contact and have an 8-10 day residual effect. Fruits and vegetables may be consumed in a shorter time period after application than Sevin.
  • Acephate – This systemic control works by poisoning the plant. The insect dies when the plant is ingested. Must not be used on edibles.
  • Malathion – This chemical must be ingested by the insect, however, this product may be used on edibles. Check label for number of days between last application and safe harvest.
  • Imidacloprid – Sold as a liquid form of Merit, this product is systemic and must be applied at least 20 days before anticipated adult Japanese beetle feeding. Only one application is needed per year. Use only on ornamentals.

Environmentally-Friendly Grub Control 

For truly effective Japanese beetle control, it is also necessary to control the grubs. This can be done in a number of environmentally-friendly ways, such as… 

  • Milky Spore – This biological control effects only Japanese Beetle grubs. Once this bacteria is established it can last in the soil for up to 20 years. It is completely harmless to people, pets, birds, fish and beneficial insects. Apply anytime the ground is not frozen.
  • Beneficial Nematodes – These microscopic worms kills grubs by feeding on, and reproducing in, the grub’s body. This is an excellent choice for a vegetable garden and should be applied after the soil is warm. Late summer/early fall application is best. 

Chemical Grub Control 

Chemical controls can also be effective at minimizing the harm from Japanese beetle grubs. Good options include… 

  • Merit – The granular form of this chemical is a systemic, season-long grub control with a 4-month residual effect, though it must be ingested by the insect. It is applied 3-4 weeks before grubs are actively feeding, mid-May through mid-June. Must be watered-in within 24 hours of application.
  • Dylox – This compound is absorbed through the grub’s ‘skin’ and will kill within 24 hours of application. Use only in late summer through early fall while grubs are still close to the soil surface. Must be watered in. It is active for up to 7 days in the soil.
  • Sevin – In its granular form, Sevin is a contact kill and will not remain active in the soil longer than 7 days. This product is used most effectively from mid-August through mid-October. Must be watered in.

With so many options for effectively controlling these pernicious insects, there is no reason why you need to keep being bothered by Japanese beetles. Once you know more about these insects and their habits, you can easily keep them away.

beetle-mania-2

beetle-mania-1

Protect Your Japanese Maples

Beautiful additions to any landscape, Japanese Maples will look their best when given some protection during hot, dry summers. As the weather becomes hotter and drier, your these trees may show signs of heat stress with the development of crispy leaf edges or, as conditions get even more extreme, leaf drop. This diminishes their stunning beauty and shrivels their leaves, but fortunately, there are several ways you can minimize this problem no matter what the weather. From planting these trees in the right spot to mulching the roots appropriately to using anti-transpirants, you can shield Japanese Maples from drought-like conditions.

Protective Planting

When planting a Japanese Maple, choose a location that receives morning sun only and has some protection from strong winds. Full afternoon sun and windy conditions will quickly stress plants and reduce leaf color. Planting a Japanese Maple in front of a western or southwestern windbreak of conifers or other evergreens will provide good shielding, or plant these trees on the eastern side of the house, garage or other structure to provide that essential barrier.

Save Moisture With Mulch

Mulching will help to retain moisture and cool root zones to protect these trees. Apply 2-4 inches of mulch under your Japanese Maples, extending out to the drip line for complete protection. Be sure to keep the mulch several inches away from the tree’s trunk to avoid fungus problems and crown rot. Ideally, install a drip watering system or other slow-release watering under the mulch to retain the most moisture with less water lost to evaporation.

Anti-Transpirant Sprays

Another way to keep your Japanese Maples looking their best is to use an anti-transpirant to helps minimize moisture loss from leaves. The best time to apply an anti-transpirant is in early summer when Japanese Maples are in peak condition, before they start showing signs of suffering from heat stress. Make your applications early in the day or on a cooler, overcast day to avoid leaf burn. Apply monthly through the hottest part of the year and your beautiful trees will look gorgeous heading into the fall season.

Japanese Maples are popular landscaping trees and make stunning specimen plants in any yard, but they can be subject to heat stress that will reduce their beauty and vitality. By taking several steps to protect them, however, you can enjoy the beauty of these trees even when summers are hot and dry, and properly protected, your Japanese Maple will look brilliant throughout the summer.

Growing Mint in Your Herb Garden

Many of us love mint. With many different flavors of mint available at garden centers, it is easy to want to plant one of each. Planning ahead makes this possible to do, but lack of planning may have you tearing them all out.

How Mint Grows

Mint grows as a groundcover. The underground runners spread quickly and are difficult to remove if containment is desired. In other words, mint is often considered invasive and can quickly take over flowerbeds, vegetable plots and even areas of turf near where it is originally planted. Planting in pots placed into the ground prevents its escape, or intensive labor may be needed to help get mint back to its original proportions after it has wandered.

Planting Mint

To help keep mint under control and more accessible for use, many gardeners opt to plant it indoors. Attractive in barrels or pots by the kitchen, mint leaves and flowers can be easily available for cooking or beverages.

To prevent plants from looking rangy, frequently cut or pinch back new growth. Pinching off the flower buds produces more lush leaves and fuller plants.

Mints grow well in sun or part shade, preferring well-drained but moist soil. Although not particular about soil type, enriching clay soil with compost will improve the overall plant appearance and taste. Different soil pH values and organic compositions may also have some minor influence on the taste of different mints.

Most mints grow 18-30 inches tall. Plant at least 2 inches apart to prevent cross-pollination of different varieties and preserve the best flavors. As a perennial, the plant may disappear in the winter, but will return in spring, hardier and more vigorous than ever.

Using Mint

It’s no surprise that mint is an edible favorite. Not only is it popular for refreshing drinks such as mint juleps or mint-infused lemonade, but it is also ideal for…

  • Sauces
  • Salads, especially fruit salad
  • Flavoring for cookies, cakes and puddings
  • Jellies and preserves
  • Smoothies
  • Soups and stews
  • Ice cream, gelato and frozen yogurt
  • Garnishes on meats
  • Freezing in ice cubes for a drink garnish

Mint can be used fresh for a strong, vibrant taste, or it can easily be dried and used all year long. Both fresh and dried mint sprigs can also be fragrant additions to cut flower arrangements, wreaths or other greenery decorations as well. With so many wonderful options for mint, you’ll want to add some to freshen up your herb garden today!

General Soil Amendments

We’ve all heard of the importance of amending the soil properly for gardening and landscaping, but the number of soil amendments sold in garden centers often confuses gardeners. Which is which, and which will work best for your soil conditioning needs?

Types of Soil Amendments

Soil amendments fall into two basic categories, inorganic and organic. Inorganic amendments come from non-living materials such as sand, perlite, vermiculite and crushed stone. With the exception of limestone and gypsum, which are used to increase soil calcium, these are not commonly used in the garden.

However, organic amendments are the opposite. They come from previously living materials such as peat, manures and composts. When leaves, bark, peat, animals and animal wastes are mixed together to decompose, compost or “humus” is the final product. Very commonly used, these materials enrich the soil by increasing the air spaces, adding extra nutrients to the soil, improving the absorption of those nutrients and increasing overall soil fertility.

Why You Need Soil Amendments

Excellent soil is not common around most homes. Even if it was initially, house construction and roadwork often removes the good soil and construction equipment compacts the remaining soil. Furthermore, heavy use of the remaining turf – children and pets playing, for example – continues to compact the soil. Chemical treatments, runoff from gutters and downspouts, removal of existing plants, changes in local wildlife – all of these factors can wreak havoc on soil.

Adding organics loosens compacted soil and results in better gardens. Incorporate organics into the beds throughout the year by working evergreen needles, leaves and lawn clippings into the soil. Amendments such as peat or lime can improve a pH problem, if one exists. Calcium and magnesium deficiencies can be corrected using organic materials such as bone meal or wood ashes, or inorganic materials such as limestone, gypsum or soft rock phosphate.

Mulching is another simple way to add biodegradable materials to the soil. Simply place mulch around the plant, leaving several inches bare closest to the stem to discourage insect invasions and rot. In addition to slowly providing nutrients as it decomposes, mulching is attractive, reduces weeds and erosion, maintains soil temperature and prevents “crusting” that occurs when soil becomes too dry.

Another advantage of adding organics is the attraction of worms. They further assist in the decomposition, increase aeration and leave worm castings, a valuable organic material, behind. A healthy garden is home to many worms, and it all starts with adding organic soil amendments.

Whether you opt for organic or inorganic soil amendments, if you use them properly, you soil will improve and your landscaping, flowerbeds and garden will look better than ever.

Ornamental Grasses

Ornamental grasses can reduce your watering costs, lessen your mowing time and increase the interest level of your garden. No matter what your garden’s needs, there’s a grass to solve it. From short ground covers to tall bamboo, there’s something for every site.

About Ornamental Grasses

Generally defined as “a plant with narrow upright leaves growing from the base,” ornamental grasses come in different sizes, shapes, colors and with differing growing requirements. While they may be cut to the ground each year, they are not mowed regularly, and work well as borders, specimen plants or part of coordinated beds. When choosing an ornamental grass for your site, consider the following:

  • Size
    Some beautiful grasses are just inches tall. Others, such as bamboo, grow to 20 feet or even taller. A shorter grass is a perfect edge for a walkway or to border a flowerbed, while a taller grass provides screening or background height.
  • Deciduous or Evergreen
    The winter form of a grass can be very different from its summer form. Evergreen grasses do not die back in the winter, their form remains the same. Winter colors may change and provide interest. Deciduous grasses die back or lean over. Consider the plant’s use when choosing between deciduous and evergreen. If using a grass as a screen, deciduous may not be a good idea.
  • Running or Clumping
    Clumping grasses stay where they planted, and as they grow, the overall plant width increases. However, a running grass sends runners through the ground to grow another grass plant. Sometimes this can be up to 6 feet away. This is advantageous when using the grass as a groundcover or trying to fill in a larger area. Clumping grasses can be divided if they become too large for the site.
  • Color
    Ornamental grasses are available in many colors, including variegated shades with contrasting edges. Additionally, many grass colors change throughout the year. Blues, reds, greens, yellow and variegated shades work well in different situations. A gold or white-hued grass can brighten a dark corner, whereas a dark green grass may be a perfect backdrop for smaller colorful plants.
  • Growing Requirements
    Sun, water, wind and soil requirements vary among grasses. Some require full sun; others grow best in the shade. Some grasses are ideal in rain gardens or wet soils, while others thrive best in drought conditions. Some don’t mind a breezy location, while others need to be more protected. Some prefer a rich, organic soil, while others will look great even in poor soils. And, of course, there are grasses for every range in between.

Before going to the garden center to purchase an ornamental grass, make a list of your requirements. You may want a short grass to line a walkway in full sun with sandy soil. Alternatively, you may need a grass to fill a dry and shady corner. Perhaps you would like to watch a grass clump emerge in the spring, grow to 6′ tall, change colors through the summer and harvest dry seed heads for an autumn arrangement. Choosing the correct grass ensures the beauty of your garden for years to come.

Rose – Queen of the Garden

We all love roses. It may be the luxurious fragrances, rich colors or the elegant flower forms that attract us. It may be the memories that roses evoke. Whatever the reason, roses are one of the world’s most popular flowers. With so many different types of roses available, ranging from the diminutive miniatures to the towering climbers, there is no excuse to exclude this “Queen of Flowers” from your garden.

Rose Types

There are many types of roses to cultivate, and it can be difficult to choose. If you’re just getting started with roses, consider some of these popular favorites…

  • Hybrid Tea Roses: These blooms are a favorite of rose gardeners who enjoy long-stemmed, large flowers. Hybrid tea flowers have many petals and plants grow upright and tall, about 3-7 feet. These roses are appropriate in either a formal garden or informal planting.
  • Floribunda Roses: These roses have smaller flowers than hybrid teas with the flowers arranged in clusters. This rose bush is useful as a hedge for a border or privacy screen, and is equally stunning in mass plantings.
  • Grandiflora Roses: These beauties were developed by crossing hybrid teas with floribundas. This rose grows to around 10 feet tall so it should be used in the back of the border where its beauty won’t shroud other plants. The flowers of the Grandiflora are hybrid tea form and can be single stemmed or borne in clusters depending on the cultivar.
  • Climbing Roses: These roses make an outstanding vertical display when trained on arbors, walls, fences, trellises and pergolas and can grow from 8-15 feet tall. Flowers may be borne large and single or small and arranged in clusters.
  • Miniature Roses: These delicate nymphs are dwarf in every way – flowers, leaves and height. This rose may be mass planted as a ground cover, used as border or grown in containers on decks, patios and porches.
  • Shrub Roses: These flowers are renowned for their bushy habit and superior disease resistance making them an excellent choice for mass planting. The shrub rose flower may be either single or double. Some types have very showy rose hips.
  • Old Roses: These luscious heirlooms are making a come-back! Although bloom times and color choices are limited, old roses are much more fragrant, vigorous and disease resistant than modern roses. To obtain all the qualities of an old rose combined with a long bloom time of a modern rose, look for the David Austin varieties.

Not sure which rose is just right for your landscape or garden? Our rose experts will be glad to help you choose the perfect rose no matter what thoughts or emotions you want your garden to evoke. Stop in today to see the latest types of roses and the most popular cultivars for this year’s gardening.

roses_3

roses_8

roses_1

Heavenly Hosta

Hostas are amazing plants, truly glorious with heavenly foliage that is stunning as a specimen or in mass plantings. The thin spikes of purple or white, trumpet shaped flowers appear for several weeks in the summer and are an added benefit to this divine perennial. But how much do you know about hostas, and which can you add to your landscape?

Phenomenal Foliage

Hostas are praised by many for their magnificent variety of leaf sizes, colors and textures. These angels will grace your garden with heart-shaped, lance-shaped, oval or nearly round leaves, and leaf sizes vary as well. Smooth, quilted or puckered textures, with either a matte or glossy sheen, add to the glory and hostas’ radiant glow.

The leaf margins can be either smooth or wavy and range in color from light to dark green. Foliage colors also include chartreuse, gray and blue, depending on the cultivar. Variegated hostas with cream, white or yellow margins will radiate in a dark area of your garden.

Where to Plant Hostas

While most hostas are shade worshippers, some types will tolerate sun, depending on the overall climate and moisture levels. Hostas remain attractive from spring until frost and can withstand a wide range of growing conditions.

As choice groundcovers or single specimens in the landscape, hostas are certainly divine. Some hostas are quite unusual and rare and may increase in value each year, especially as the plants thrive and can be divided and transplanted with ease.

Best Hosta Care

Little maintenance is required to care for hostas. Cut off old flower stalks after flowers have faded. Divide plants occasionally to increase their quantity. Keep an eye out for pests, especially slugs and snails that munch on the foliage.

Types of Hostas

With so many selections and varieties, you can find a hosta the will fit into almost any garden situation. The most popular options include…

  • Dwarf & Small Hostas: In addition to being planted in secret little pockets throughout your garden or next to paths, dwarf and small hostas can be used in difficult places. Plant them among tree roots, on a slope or terrace or in rocky places containing little soil.
  • Edger Hostas: These hostas are 12” or less in height and have more horizontal growth. They are able to control weeds as they leave no light, when well established, or room for weeds to grow.
  • Groundcover Hostas: This group of hostas grows to 18” or less in height. They do a great job in areas difficult to weed or maintain. If you are in need of a hosta for use as a groundcover, keep in mind it works great to plant spring-flowering bulbs among them. The hosta comes up after the show of flowers and covers the fading foliage of the bulbs.
  • Background Hostas: Selections from this group grow to 24” or taller at maturity. They can be used to increase privacy where you sit and relax or to provide definition to your property line as a unique hedge.
  • Specimen Hostas: Specimens may be any size. Choose a site close to where the plant will be viewed so that every detail (texture, color pattern, buds, flowers and fragrance) may be enjoyed.

Not sure which hosta is right for you? Come in today and let our landscape and garden experts help you choose the right heavenly hosta to add a bit of the divine to your yard!

hosta_1

hosta_2

hosta_3

hosta_4

Dwarf Evergreen Conifers

Dwarf conifers are some of the most versatile and popular plants of today’s modern garden and landscape. These fantastic plants add interesting texture, color and form to rock, pond and container gardens as well as any type of mixed border. They come in a variety of cultivars of different sizes and growth habits, and more cultivars are being introduced all the time. Dwarf conifers are virtually carefree and often provide four seasons of interest.

Dwarf Conifer Types

We commonly think of conifers as needled evergreens such as pines, spruce and firs, but not all conifers are needled and not all are evergreen. The common larch is needled, but deciduous. Ginko trees are conifers that have fan-shaped deciduous leaves, and this tree is neither needled nor evergreen. What identifies a plant as a conifer is that it is cone-bearing.

Dwarf conifers are slower growing and smaller versions of the straight species of a given conifer. A good example is the Eastern White Pine, Pinus strobus, which can reach a height of 100 feet at maturity. The dwarf version of this plant, Pinus strobus ‘Nana’, will only grow to eighteen feet at maturity, but other than its size, it shares all the charming characteristics that are so well loved about the full-size tree.

Thanks to their popularity, new varieties of dwarf conifers are being introduced each season. This gives you an almost endless selection to consider for your landscaping needs. Some of the most popular options include…

  • Abies alba ‘Green Spiral’ (Silver Fir)
  • Abies lagrocarpa ‘Arizona Glauca Compacta’ (Rocky Mountain Fir)
  • Abies procera ‘Sherwoodi’ (Noble Fir)
  • Abies balsomea ‘Nana’ (Dwarf Balsam Fir)
  • Cedrus deodora ‘Albospica’ (Deodar Cedar)
  • Chamaecyparis obtusa ‘Nana’ (Dwarf Hinoki Falsecypress)
  • Chamaecyparis obtuse ‘Nana Lutea’ (Hinoki Falsecypress)
  • Chamaecyparis pisifera ‘Aurea Nana’ (Japanese Falsecypress)
  • Picea abies ‘Little Gem’ (Norway Spruce)
  • Picea abies ‘Conica’ (Norway Spruce)
  • Picea abies ‘Pumila’ (Norway Spruce)
  • Picea abies ‘Argenteospicata’ (Norway Spruce)
  • Picea pungens ‘Montgomery’ (Colorado Spruce)
  • Picea pungens ‘Fat Albert’ (Colorado Spruce)
  • Pinus cembra ‘Glauca Nana’ (Swiss Stone Pine)
  • Pinus mugo (Mugo Pine)
  • Pinus nigra ‘Hornibrookiana’ (Autstrian Pine)
  • Pinus sylvestris ‘Globosa Viridis’ (Scotch Pine)
  • Tsuga canadensis ‘Gentsch White’ (Canadian Hemlock)

Not sure which of these or other amazing dwarf evergreen conifers are best suited for your landscape? Let our experts help you choose a beautiful tree that will be a standout however you may use it in your yard.

dwarf_2dwarf_3

dwarf_1

Perennial Power

Perennials may not be the best showstoppers in a garden full of annuals, but they make great foundation plantings to serve as a reliable backdrop or trusty fillers among other plants. There’s no reason you can’t select perennials that are just as beautiful as your favorite annuals, however, it’s just a matter of choosing the flowers that pack the most punch and using them appropriately.

Best Perennials to Choose

When choosing a perennial to fill an empty space in your garden, make sure to get the most bang from your buck by selecting one, or several, long-blooming perennials. These flowers will be worthwhile additions to your landscape for their ongoing staying power, giving you a reliable backdrop and structure to build from.

  • Achillea (Yarrow)
  • Alcea (Hollyhock)
  • Anemone (Wind Flower)
  • Asclepias tuberosa (Butterfly Weed)
  • Campanula (clips series)
  • Clematis ‘Jackmani’
  • Coreopsis (Tickseed)
  • Corydalis lutea (Yellow Bleeding Heart)
  • Delosperma (Ice Plant)
  • Dicentra exima (Bleeding Heart)
  • Doronicum
  • Echinacea (Coneflower)
  • Gallardia (Blanket Flower)
  • Gaura (Wand Flower)
  • Geranium ‘Johnson Blue’
  • Helenium (Helen’s Flower)
  • Heliopsis (Sunflower)
  • Hemerocallis ‘Stella D’Oro’ (Daylily)
  • Hemerocallis ‘Happy Returns’ (Daylily)
  • Kniphofia (Red Hot Poker)
  • Lavender
  • Liatris spicata (Gayfeather)
  • Ligularia (Ragwort)
  • Lobelia cardinalis (Cardinal Flower)
  • Lythrum (Loosestrife)
  • Malva (Mallow)
  • Monarda (Bee Balm)
  • Nepeta (Catnip or Catmint)
  • Oneothra ‘Siskiyou’ (Evening Primrose)
  • Perovskia (Russian Sage)
  • Rudbeckia (Coneflower)
  • Salvia (most verticillata)
  • Scabiosa (Pincushion Flower)
  • Shasta Daisy ‘Becky’ or ‘Snow Queen’
  • Stokesia (Stoke’s Aster)
  • Veronica (Speedwell)

Using Your Blooming Perennials

To make your perennials truly pop, it’s important to position them in your landscape where they will show to their best advantage. Popular options include…

  • Filling in between showstopping annuals with perennials that will grow and bloom to cover fading blooms after the annuals are finished.
  • Adding blooming perennials in front of a hedge, fence or privacy screen for extra coverage with a dash of color.
  • Using perennial flowers as a backdrop for lower annual plantings along a house foundation or in other flowerbeds.
  • Creating a naturalized lawn or meadow-like area full of different perennials for a low-maintenance option that still stuns.
  • Planting perennials in hard-to-tend areas, such as alongside a water feature, in tight corners or on terraces so they can be gorgeous with less maintenance.

With so many options for lovely perennials that can be used in many different ways in the landscape, there’s no excuse not to enjoy these easy-care flowers for many years!

peren_2peren_3

Watering Tomato Plants

Proper watering plays a significant role in producing a healthy tomato plant with tasty, meaty, juicy fruit. So, what’s the secret, and how can you be sure you are watering your tomatoes the right way?

Watering Location

Always water tomatoes at the root zone; never overhead water your tomato plant. Watering directly at the soil level will strengthen the plant’s root system and ensure the maximum amount of moisture reaches the roots. When you overhead water, much of the water will not make it to the roots as it evaporates before reaching the soil. Water droplets on plant leaves act as a magnifying glass and can burn tender plant tissue, damaging foliage that is essential to keep the plant healthy. Water dripping from leaf to leaf can also spread disease, infecting an entire crop. To be sure tomatoes are not being watered inappropriately, keep plants out of reach of lawn sprinkler systems or other inadvertent watering.

Watering Speed

Slow watering is essential to properly distribute moisture to a tomato plant. Allow the water to drip slowly into the soil, giving the plant roots time to absorb the moisture. A drip system is best and will also help with water conservation. Avoid using a hand held hose, as it is easy to either underwater or overwater using this method. Water to a depth of 8 inches to ensure all roots have access to adequate moisture. You can also use a watering reservoir, such as a gallon jug with several small holes in its bottom, to slowly and carefully water the plants without flooding the root zone.

Watering Frequency

A regular watering schedule is essential for the healthiest, most productive tomato plants. Water consistently to produce larger fruits and to avoid split and cracked fruit and blossom end rot. Tomato plants should be watered 2-3 times a week in the height of summer or when natural rain is lacking. A deep soaking rain counts and supplemental watering should be adjusted whenever Mother Nature lends a hand with watering chores. The top inch or two of soil should dry out between watering to be sure the plant is not getting too much moisture.

Watering Adjustments

There are several times when it may be necessary to adjust where, when and how much you water your tomatoes. Changes in local rainfall – increasing spring or summer rains, a sudden storm, an unexpected drought – can require changes in supplemental watering to keep the moisture to your tomatoes consistent. As plants grow and more fruit appears, more water may be needed to meet the plant’s watering needs and keep it lush and healthy.

By understanding the basics of watering tomatoes, you can keep your plants well hydrated without risk of either overwatering or underwatering, both of which could be disastrous for your tomato crop.

WaterTomato