No matter how cold the temperatures or how deep the snow, you can enjoy the pleasures of herbs this winter season by growing them in your windowsill. Herbs are great for adding zest to any food and are a delicious substitute for salt and artificial flavors. They can also make dinner a visual delight! Add herbs to breads, soups and stews for flavor or use as a lovely garnish. Here are some great selections to try…
Rosemary is a must for the cook. Fresh rosemary is much richer and more fragrant than dried sprigs. Its needle-like foliage has a piney or resinous aroma and flavor. Rosemary is good with any meat or poultry, with stronger tasting fish, and with pizza, breads and potatoes. It is companionable with garlic and citrus flavors. A pleasing apple jelly can be scented with rosemary for a gourmet touch.
Chives, being a member of the onion family, is one of the few flavoring plants that appreciates some fertilizer. The hollow spears should be cut as needed by clipping a few spears just above the ground. It is used mostly as a garnish or final ingredient wherever a light onion taste is wanted, and it won’t overpower your recipes.
Mints are a necessity for herb windowsill gardens. No one would want to be without spearmint and peppermint, and maybe orange mint, for fresh teas and additions to fruit cups and ice cream. Fragrant and luscious, mints also make delightful garnishes for drinks or can be frozen into ice cubes.
Sage is a standby for poultry, breads and stuffings and combines well with corn or apples. Fried leaves are good to nibble. Experiment with different types of sage to enjoy their subtle variations and different flavors.
Thyme, a huge family of small upright, mounding or creeping plants, comes in a variety of flavors. You will find varieties labeled French, English, Common and Lemon, with leaves that may be all green or silver-edged or even variegated with gold. Every herb garden should have some thyme, and it pairs will with lamb as well as in marinades and salads.
Oregano is the hardier cousin of marjoram. It is a familiar flavoring in Italian and Greek cooking, in meats, sauces and of course in pizza. Oregano can be added to salads, used in marinades or mixed in with breads for rich flavor without any butter needed.
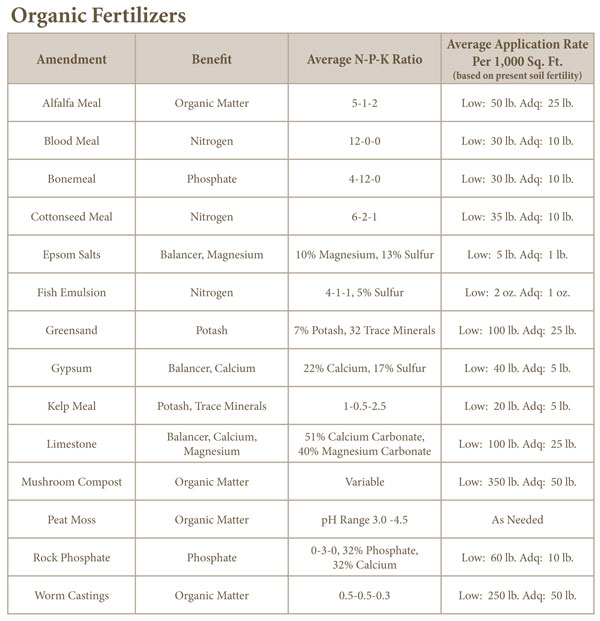
When growing your herbs, be mindful of their sunlight needs and keep them away from heating vents that can dry the soil out too quickly. Use organic fertilizers like fish emulsion and seaweed sparingly. Although fertilizers make the plants beautiful to look at, the less fertilizer used on an herb, the better it will taste. Now is a great time to start growing or to add to your culinary herb collection. Winter is the perfect time to start adding zest and flavor to your cooking!