Monthly Archives: February 2017

Try Something New: Pomegranates

Want to grow an exotic fruit that is delicious, nutritious, beautiful and incredibly hip? You really should consider planting a pomegranate! It’s not as difficult as you may think.

Why Pomegranates are Popular

Pomegranate is a stunning superfood rich in antioxidants, folic acid and vitamins A, C and E. It has no cholesterol, and is also rich in fiber and potassium. Because of these nutritional advantages, pomegranate is showing up in a multitude of supermarket products like yogurts, juices, salad dressings, jellies and desserts. It can be added to sauces, fruit crisps, salsas, relishes, dips and more. You can even make a pomegranate martini! And, of course, it’s an extraordinary experience eating a fresh pomegranate. These are stunning, delicious fruits that are rarely seen in backyard gardens, but can make a great landscaping statement when properly grown.

Growing Pomegranates in the Landscape

Pomegranates grow as multi-stemmed, small trees or large shrubs. They reach 15 feet tall by up to 15 feet wide. In spring, vibrant, gorgeous orange-red flowers grace the branches of this plant. These beautiful blossoms develop into the luscious pomegranate fruit containing dozens of tart and tangy bright red seeds and pulp. The fruit ripens somewhat square in the early fall and has a leathery skin that can be yellow to red in color.

The cultivar ‘Wonderful’ is hardy to zone 7 and is easy to grow. Plant your tree in full sun. It will thrive in the summer heat and in most soils. Pomegranates are drought tolerant, however, the fruit is better and the seeds more plump with regular deep irrigation. Because this fruit tree is self-fertile, there is no need to plant a second one for pollination.

Enjoying Your Pomegranates

If you’ve never cut your own pomegranate, it can be frustrating to learn how to separate the juicy seeds from the husk and membrane. To access the seeds…

  1. Cut off the crown of the fruit.
  2. Score the leathery husk in quarters from stem to crown end.
  3. Set the scored fruit in a bowl of cool water and let soak for a few minutes.
  4. Hold the fruit under water and break scored sections apart with your fingers, separating the seeds from membrane. The seeds will sink to the bottom of the bowl.
  5. Discard the skin and membrane.
  6. Drain the seeds on paper towels.
  7. Toss pomegranate seeds into your salad, mix them in your yogurt or smoothie or shake them into a martini and enjoy!
pomegranate-1pomegranate-2pomegranate-3

Crape Myrtles

No yard or landscape should be without a crape myrtle, or two, or three or… many! How wonderful to have something that blooms so profusely during that time of year when most other plants are looking tired and worn from the summer heat and drought. The versatility of this plant makes it suitable for many types of yards and many uses, and once established, they will go on to add charm and delight to the landscape for many years.

About Crape Myrtles

Crape myrtles bloom in late summer and can be found in flower colors of pinks, lilac, white, reds and purples. Requiring very little maintenance once established, crape myrtles need a full sun location to thrive and they do not like wet feet. Keep these needs in mind when selecting a site to plant them. They will require some supplemental watering for the first year or so to get off to a good start and develop good roots. Crape myrtles are also pretty much pest-free, except for aphids on occasion and these are easily controlled with an insecticidal soap spray. Some varieties are more susceptible to powdery mildew than others but most of the newer varieties are more resistant to this fungus problem.

Planting Crape Myrtles

Although tolerant of a wide range of soil qualities, crape myrtles grow poorly in wet locations so be sure to select a well-drained planting site. Late spring to early summer is the best time to select and plant your new crape myrtles while they are actively growing and can settle in quickly. Plant at or slightly above ground level, spreading the roots out slightly and using mulch to protect and shelter the roots after planting. They do prefer a slightly acid soil.

Crape Myrtle Types

Crape myrtles can be found in shrub, multi-stem tree and single trunk tree forms. For best results select a cultivar whose growth characteristics and ultimate mature size fit your intended use. Planting a shrub- or tree-like crape myrtle in an area of limited space will require yearly pruning to keep it from outgrowing its place. Single- or multi-stemmed tree-form crape myrtles are ideal as flowering specimen trees or as small, flowering shade trees near patios, walkways and entrances. Shrub forms make an excellent accent in a shrub border when planted in groups. Dwarf plants are effective as large groundcovers, perennial bedding plants or container plants providing vivid, summer-flowering interest.

Pruning Crape Myrtles

If adequate room is provided, little pruning is required except to maintain shape or remove any dead or crossing branches. Remove any suckers or water sprouts to maintain tree forms and elegance. Blossoms are produced on new growth so you can prune anytime the plants are dormant through the winter.

With so much to love about these plants, there’s no reason not to add one to your yard this year! And next year, and the year after that, and the year after that…

Save

Rose Care Basics

Beginners often become confused with the many recommendations and suggestions for growing roses. However, it is important to start with the basic guidelines for successful rose growing. Roses can thrive under many conditions, but they are sure to grow better, with more luxurious blooms and fewer problems, when you follow the basics. 

Prepare the Soil 

The proper soil is essential to nourish roses so they can grow to their full potential. To make the soil ideal for roses… 

  1. Take a soil sample to test the pH, either with a home testing kit or through your local extension service. Roses like a pH of 6.0 to 6.8. You may need to add lime to raise the pH or sulfur to lower it to the optimum rose range.
  2. Incorporate composted cow manure or other healthy compost into the soil. This will provide superior drainage and excellent organic material for roses to absorb.

Planting Roses

If they aren’t planted properly, roses won’t thrive as well as they could. Improper planting could even damage roots and destroy a rose bush. 

  1. Select a sunny spot with good soil drainage – roses require at least 6 hours of full sun daily. Early morning sun is preferred because it dries the leaves, which helps prevent disease.
  2. Dig a wide, shallow hole that is 2-3 times as wide but not quite as deep as the root ball (about 1 inch shallower). The plant should sit on solid ground so it doesn’t sink when the soil settles.
  3. Remove the plant from the pot and loosen any circling roots. If you can’t pull the roots apart, use a knife to make 4-5 vertical cuts in the root ball. This will allow new roots to grow out into the surrounding soil as the plant becomes established.
  4. Place the plant in the hole slightly elevated above ground level. Backfill with soil until the hole is half full.
  5. Soak the root ball with a mixture of a Root Stimulator & Transplanting Solution.
  6. Fill the rest of the hole with soil and water thoroughly. Apply mulch to a depth of 2 inches, being careful not to mound mulch against the trunk of the plant, which could encourage rotting or insect damage.

Pruning Roses 

To look their best, roses must be properly pruned. This can be intimidating for rose-growing novices, but once the basics are mastered, the techniques for pruning roses are not difficult. 

  1. In spring, remove winter mulch when new grow appears. Prune out all dead wood and twiggy growth and cut back to sound wood with a clean slanting cut, just above a good bud eye.
  2. During the growing season, remove fading roses promptly, cutting just above a five-leaflet leaf. This will help encourage reblooming on many cultivars, and will help prevent rot or disease infestation.
  3. To winterize, remove all fallen leaves and debris from the base of the plant, cut back to 10-12 inches after the ground freezes, then apply a mound of mulch over the canes to protect them from temperature shock. 

Food and Water 

Roses need the proper nutrition – water and fertilizer – to bloom well and develop stunning colors and fragrances. 

  1. Roses thrive best when given 1 inch of water weekly. A thorough soaking from rain or hose will keep roses blooming all season. Try not to overhead water unless it is early in the day, as the damp leaves can promote disease.
  2. Fertilize monthly with Espoma Rose-tone or similar products specially formulated for the nutritional needs of roses.

Treat for Disease and Pests 

There are times when roses will succumb to diseases and pests. Quickly recognizing these problems and treating them properly will help minimize outbreaks that can damage several rose plants at once. 

  1. Fungus diseases cannot be cured, so a regular spraying schedule is very important. Keep an eye on plants that were infected last year and spray with a fungicide to prevent outbreaks this year.
  2. You may also need to use an insecticide for severe insect problems. Minor problems can be handled with less harsh methods, but diligence will be necessary to keep pests from taking over the rose bushes.
  3. Many rose lovers find it convenient to use an all-purpose insect and disease spray once a week or a systemic control every 6 weeks.

It may seem like a lot of work to cultivate roses, but when you wander through your rose garden or see your favorite rose bush in full bloom, that effort will be well rewarded.

Spraying the roses

rose new budding

Garden Fence, Pink Roses

Espalier

Espalier is the process of training trees or shrubs, by pruning and trellising, to create a vertical, two-dimensional, formal pattern. The purpose of espalier is to artfully train a tree to grow in limited space, to provide pattern and texture on a solid wall, to grow fruit in a limited space and to create privacy in the garden.

It is possible to purchase plants that have been already been espaliered, however, your selection of plant choices will be limited and it’s not nearly as much fun as doing it yourself. Fortunately, it’s not as hard to do as it may sound!

Espalier Basics

To begin, choose a spot in full sun where you have garden space at the foot of a bare wall or fence. It is important to remember to leave about 6 inches of space between the wall or fence and the plant to allow sufficient room for roots to grow. A wire frame is often used in place of a trellis when choosing this type of plant training, though a trellis may be used when training a plant for privacy when no wall is available. Screw eyebolts into the side of a building at 1-foot intervals, horizontally and vertically. Tie wire between the bolts to create a grid. There are many styles and patterns, of espalier to choose from, some simple, some complicated. It may help to layout your design on graph paper first to solidify your plan and to visualize its complete form.

Select a tree that is young as its branches will be more flexible and more readily trainable. All branches must be pruned from the side that will be flush with the wall or trellis. Tie the main trunk to the wire grid with a twist tie, then prune away all branches that grow forward leaving only laterally spreading branches. Next, begin tying the lateral branches to the frame at approximately a 45-degree angle from the ground. You now have the beginnings of an espalier! This process will require annual maintenance. Branches chosen to be part of your original design should be retrained and retied yearly. Check the ties twice a year to make sure that they are not strangling the branches, and loosen them as necessary. Branches that are not needed to maintain your design should be removed.

Pruning Your Plant for the Best Espalier

Pruning and training will continue throughout the life of your chosen plant. Generally, most major pruning is done in late winter to early spring before new growth begins, but pruning at different times can have different advantages. Pruning during the dormant season or early spring, for example, will stimulate new growth that can help fill a pattern in more quickly. Pruning in mid-summer (June, July) tends to have a dwarfing effect, ideal to keep a more mature plant under control in a smaller space. Pruning should not be done in late summer, however, as this could stimulate new growth that will not have time to harden off before a heavy frost sets in.

An espalier design can take years to fill into a luxurious form, but the effort and meticulous nature of this type of plant training can be well worthwhile for a unique and eye-catching feature in your garden.

Apple Fruit.

Watering Tomato Plants

Proper watering plays a significant role in producing a healthy tomato plant with tasty, meaty, juicy fruit. So, what’s the secret, and how can you be sure you are watering your tomatoes the right way?

Watering Location

Always water tomatoes at the root zone; never overhead water your tomato plant. Watering directly at the soil level will strengthen the plant’s root system and ensure the maximum amount of moisture reaches the roots. When you overhead water, much of the water will not make it to the roots as it evaporates before reaching the soil. Water droplets on plant leaves act as a magnifying glass and can burn tender plant tissue, damaging foliage that is essential to keep the plant healthy. Water dripping from leaf to leaf can also spread disease, infecting an entire crop. To be sure tomatoes are not being watered inappropriately, keep plants out of reach of lawn sprinkler systems or other inadvertent watering.

Watering Speed

Slow watering is essential to properly distribute moisture to a tomato plant. Allow the water to drip slowly into the soil, giving the plant roots time to absorb the moisture. A drip system is best and will also help with water conservation. Avoid using a hand held hose, as it is easy to either underwater or overwater using this method. Water to a depth of 8 inches to ensure all roots have access to adequate moisture. You can also use a watering reservoir, such as a gallon jug with several small holes in its bottom, to slowly and carefully water the plants without flooding the root zone.

Watering Frequency

A regular watering schedule is essential for the healthiest, most productive tomato plants. Water consistently to produce larger fruits and to avoid split and cracked fruit and blossom end rot. Tomato plants should be watered 2-3 times a week in the height of summer or when natural rain is lacking. A deep soaking rain counts and supplemental watering should be adjusted whenever Mother Nature lends a hand with watering chores. The top inch or two of soil should dry out between watering to be sure the plant is not getting too much moisture.

Watering Adjustments

There are several times when it may be necessary to adjust where, when and how much you water your tomatoes. Changes in local rainfall – increasing spring or summer rains, a sudden storm, an unexpected drought – can require changes in supplemental watering to keep the moisture to your tomatoes consistent. As plants grow and more fruit appears, more water may be needed to meet the plant’s watering needs and keep it lush and healthy.

By understanding the basics of watering tomatoes, you can keep your plants well hydrated without risk of either overwatering or underwatering, both of which could be disastrous for your tomato crop.

WaterTomato

Spider Mites

Spider mites are one of the most common pests in landscapes and gardens and feed on many fruit trees, vines, berries, vegetables and ornamental plants, as well as houseplants. These tiny mites are just large enough to be seen with the naked eye, but may just look like tiny, moving dots. For tiny creatures, they can do considerable damage to plants if left unchecked.

How Spider Mites Hurt Plants

Spider mites cause damage by sucking cell fluids from plant leaves. A small number of mites usually isn’t a reason for concern, but plants can sustain heavy damage if populations are high and the infestation spreads. You may notice a stippling of light or yellowish spots on affected leaves and often the webbing of mites can be seen on leaves and stems. As the damage continues, leaves may turn completely yellow, dry up and fall off the plant.

Controlling Spider Mites

Spider mites reproduce rapidly in hot, dry weather, therefore, keeping plants well watered is a good deterrent to heavy infestations. There are also many natural enemies to these pernicious bugs, such as lacewing larvae and some lady beetles that help to keep mite populations under control. Cultivating these helpful insects may be all that is necessary to minimize spider mite activity unless the infestation has already increased and spread.

Because spider mites are too tiny to pick off infected plants, judicious pruning or trimming of infested plants can help remove these pests. In heavy infestations, it may be necessary to discard an entire plant to take the mites with it. Do not put these clippings or removed plants in compost piles, however, or the mites will continue to thrive and will return to healthier plants.

At times, it may be necessary to use chemicals to deter spider mites. Be careful when using broad spectrum insecticides, however, as these will kill any beneficial insects as well as the spider mites, which can disrupt the delicate balance of a garden’s ecology. Simply spraying plant leaves with a blast of water, taking care to spray the undersides as well, can help to reduce mite populations by physically removing the spider mites. Insecticidal soaps and neem oil are also good choices when dealing with spider mites.

Once the mites have been removed, damaged plants may look bedraggled, but they will generally recover within a season or two, especially if the pests were recognized and treated quickly. Don’t let spider mites catch you in their webs – get rid of them today!

Green Gardening

Planting a vegetable or flower garden seems like the perfect thing to do when you are looking for ways to adopt a greener, more environmentally-friendly lifestyle. Some traditional gardening practices, however, may not be quite as “green” as you might think. Planning your gardens with the environment in mind and choosing some practices that maintain healthy ecosystems can help you create a truly “green” garden. 

Tips for a Green Garden 

There are easy, effective steps you can take in your garden to go green, including… 

  • Plant local and native species of trees and shrubs which are naturally adapted to the conditions in your area, thus requiring less watering and having natural defenses for local insect pests and plant diseases.
  • Collect rainwater for watering your container gardens and new transplants, and adjust your irrigation schedule to compensate for whenever Mother Nature does the watering for you.
  • Use organic compost and mulch to improve soil health and reduce the need for pesticides and fertilizers. Better yet, make your own compost so you can adjust it to exactly what your plants need while keeping more waste out of landfills.
  • Opt for disease-resistant and pest-resistant plants rather than trying to force plants into an unfriendly area where they will need chemical assistance and extra maintenance to thrive.
  • Try to use natural products instead of chemical fertilizers and pesticides. Use traps, parasites and natural predators such as ladybugs and lacewings. Plants that repel insects – basil, chives, mint, marigolds or mums – mixed in with other plants can help keep pests away.
  • Choose wildlife-friendly plants such as flowerbeds that will attract hummingbirds, butterflies, bees and other pollinators, and don’t be upset to share some of your garden space with other critters.

These are just a few of the simple changes you can make in your gardening practices that will benefit the environment.

Green Products 

More and more “green” products are readily available to help you maintain the natural health of your garden. Before using a product, however, be sure it is suitable for your situation, and follow all application and use instructions. Even organic or eco-friendly products can become toxic contaminants if they are improperly used.

Popular options for green gardening products include… 

  • Dr. Earth contains probiotic beneficial soil microbes, plus ecto- and endo- mycorrhizae which feed the fiber of the living soil by releasing natural organic matter. People and pet safe.
  • Dr. Earth pest controls are organic controls for all of your pest problems, including all types of unwanted or troublesome insects. People and pet safe.
  • Espoma Organic Traditions line of products includes bone meal, kelp meal, garden sulphur, potash and garden lime for helping to improve your soil without artificial chemical compounds.
  • Bonide offers organic fertilizers as well as organic formulas for pest and plant disease control, such as fruit tree sprays.
  • Scotts Organic Choice lawn care products provide more environmentally friendly choices for your yard.

Developing “green” gardening practices benefits you and your family, your garden, your native plants and animals, your water supply – our world, all of us.

SONY DSC

Succulent Container Garden

Have you noticed how a container garden can really jazz up a front entryway, back deck or porch? Perhaps you’ve thought twice about including this addition to your plantscaping because you just don’t have time every day to water.

Cheer up! You can plant a container with succulents (plants with fleshy or thickened leaves, stems or roots) and you will not have to worry about watering frequently. Succulent container gardens are relatively carefree, and they’re so easy that you don’t have to limit yourself to just one. If one container makes a statement, several will create a conversation!

Succulent Container Garden Tips and Tricks

To have the greatest success with your new succulent container garden, consider…

  • Exposure
    Full sun is a must for all succulents and will help show off their subtle colors and textures. If your viewing location has less than adequate sun, place your succulent garden in a full sun area for the majority of the day and move to your desired location when you have company or time to enjoy it yourself. Remember to move it back out into the sun when company leaves.
  • Containers
    Because succulents do not have extensive root systems, your chosen containers may be shallow. Too much soil can hold excessive water causing the succulent’s roots to rot. Perhaps a strawberry pot would make the perfect focal point at your front door, and many front doors look great with a single shallow round planter sitting on the stoop. If you have several steps to the door, try a pot on each step. How do you want your front entrance to say “hello”?
  • Height
    Think about varying the heights of your containers. Perhaps your containers will require a pedestal or something else for elevation. This could be an inverted pot, a table, shelf or even pot feet. You may even consider hanging your container for elevated elegance. Whatever you choose, it’s important to remember succulents require excellent drainage. Therefore, the containers must have holes.
  • Soil
    All succulents need fast draining soil. Pre-mixed soil is available that is specifically blended for succulent container plantings. You may also use a general all-purpose potting mix and add perlite, coir or sand to increase the drainage sufficiently.

Plants for Your Succulent Container Garden

When making your plant selection, it is fun to let your imagination go wild and embrace the full range of amazing succulents available. As a good container gardening rule of thumb, Use a thriller (something stunning to catch the eye), a filler (a sturdy, reliable choice to fill in bare spots) and a spiller (a trailing plant to blur the container edges) and you’ll never go wrong.

Succulents come in an extensive variety of colors, striking shapes and varying sizes. As when planting any container, evaluate plant color, texture and shape when making your selections. You may feel overwhelmed when choosing your plants. If you can’t decide, here is a simple “recipe” for planting one 16″ container to be seen from all sides. Maybe it will give you some ideas:

  • 1-thriller (Euphorbia tirucalliSticks on Fire‘) planted in the middle.
  • 3-fillers (Kalanchoe blossfeldiana) to surround the thriller and provide texture or color contrast
  • 5-spillers (Sempervivum arachnoideum) to drape over the container’s edge.

As an extra bonus, many succulents bloom, adding extra unexpected beauty. Blooms can be few and far between, however, but they will be exciting and rewarding when they are spotted.

The Importance of Topdressing

After planting, gently brush off any residual soil from the succulents’ leaves. Add more interest by topdressing the container. This is a layer of material will give your container garden a finished appearance. Desert type plants look great with a thin layer of light tan-colored gravel or red lava rocks. Create sparkle with sea-glass toppings or add a clean, contemporary look to Zen-like or Asian inspired plantings with smooth black river stones. Other popular top dressings include glass marbles, colored aquarium gravel or tiny seashells. You might even add a fairy garden surprise in the container, such as a miniature hut, hidden gnome or other quaint character who will call your succulent garden home.

Most importantly, have fun!

succulent-2succulent-3

succulent-1

Tomatoes and Peppers – A Gardening Tradition

Tomatoes and peppers are two crops you can never have too much of. They freeze well without the difficulty of blanching, and although the texture of tomatoes disintegrates, the flavor remains good. Both tomatoes and peppers offer brilliantly colored fruit that can be particularly attractive in the garden or in containers. Both have the same requirements – a sunny, nutrient-rich site that is well-drained. To prevent disease problems, neither should be planted in a location where tomatoes, peppers or eggplants were grown the previous year. If you’re not growing both tomatoes and peppers, you’re missing out!
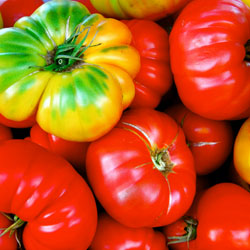
Tomatoes

Tomatoes come in two different types: determinate and indeterminate. Determinate, or bush varieties, grow 1-3’ tall. When flowers form at the vine tips, the plant stops growing. This means fruit sets all at once – which makes them excellent for canning. Indeterminate types, on the other hand, have sprawling vines that grow 6-20’ long, and keep producing and growing until frost. Indeterminate vines should be pruned to ensure that they do not put too much energy into vine production. Pinch out sideshoots (“suckers”) as they develop to prevent excess growth and encourage more fruit.

Tomato plants should be set deep in the soil with the first leaf just above ground level. Leggy plants can even be planted horizontally as roots will develop from the planted stem.

Blossom-end rot can be a common problem with tomatoes. It is a leathery scar that develops on the bottom of the fruit. This is caused from a deficiency of calcium and/or irregular watering. To ensure a supply of calcium, work BumperCrop soil amendment into the soil before planting and maintain regular watering. Feed tomatoes once a month with BumperCrop Vegetable food. Apply mulch around all vegetable plants to help keep the soil moist and cool.

Another disease, early blight, makes dark, depressed areas on the leaves just as first fruit appears. Late blight appears as black, irregular, water-soaked blotches on leaves and dark-colored spots on fruits. Both diseases usually occur during cool, rainy weather. Destroy plants to keep from infecting other plants and select resistant varieties to minimize future outbreaks.

Spread by aphids, tobacco mosaic virus will appear as yellow, mottled foliage with fruit possibly being stunted. Severely affected plants should be destroyed. Aphids should be controlled to prevent infection.
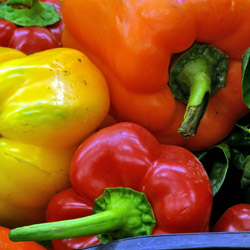
Peppers

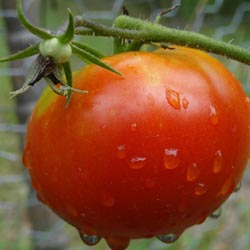
Ranging in selections from crispy sweet to fiery hot and from big and blocky to long and skinny, peppers should be cut from the plant rather than pulled off. Most sweet peppers become even sweeter when they mature as they turn from green to bright red, yellow, orange or even brown or purple. As hot peppers mature and turn red, they get hotter.

Peppers are also susceptible to blossom end rot and tobacco mosaic virus the same as tomatoes. The same measures should be taken to prevent infection.

Although we’ve touched on the most common problems with tomatoes and peppers – if you’re not sure, bring in a sample to let one of our experts correctly diagnose the problem and help you find a solution.

Types of Tomatoes & Peppers -below are a few we may carry visit our product page for a an updated list. 

Tomatoes

  • Beefsteak – Large slicer
  • Better Boy (VFN) – Medium
  • Big Beef – Large slicer
  • Big Girl (VF) – Medium
  • Celebrity (VFNTA) – Medium
  • Champion (VFNT) – Large
  • Early Girl (VF)- Medium, early
  • Husky Gold (VF) – Medium yellow
  • Husky Red (VF) – Medium
  • Lemon Boy (VFN) – Yellow
  • Patio – Self-supporting, medium
  • Roma (VF) – Medium
  • Sunray – Yellow
  • Supersonic – Medium to large
  • Supersteak – Large slicer
  • Sweet 100 – Cherry

Notations after the tomato variety designate their resistance to the following diseases: V-Verticillium, F-Fusarium, N-Nematodes, T-Tobacco Mosaic, A-Alternaria

Peppers

  • Biscayne Italian Fryer – Sweet
  • California Wonder – Sweet
  • Cherry Hot – Hot
  • Cubanelle – Sweet
  • Golden Bell – Sweet
  • Habanaro – Hot
  • Hungarian Wax – Hot
  • Italian Gourmet Fryer – Sweet
  • Ivory Bell – Sweet
  • Jalapeno – Hot
  • Jupiter Green – Sweet
  • Lady Bell – Sweet
  • Lilac Bell – Sweet
  • Long Hot Cayenne – Hot
  • Mandarin (Orange Bell) – Sweet
  • Sweet Banana – Sweet

In The Kitchen

There are hundreds of delicious recipes to try with either tomatoes, peppers or both at once, whether they are fresh or canned. Try this favorite tomato recipe, and use your strong crops of both of these fruits to experiment with different flavors and tastes all year long!

Scalloped Fresh Tomatoes

  • 1 medium onion, chopped
  • 2 Tbsp butter or margarine
  • 4 medium, ripe tomatoes, sliced
  • 1 cup grated sharp cheese
  • 1 cup fine, soft bread crumbs
  • 1 cup dairy sour cream
  • 2 eggs, well-beaten
  • ½ tsp salt

Cook onions in butter until tender. Place half the tomatoes in a 10 x 6 x 11 ½” baking dish. Top with half each onions, cheese and crumbs; repeat. Mix remaining ingredients. Pour over top. Bake at 350 degrees for 35-40 minutes. Serves 4-5.

tomato-pepper-2OLYMPUS DIGITAL CAMERA

Top Native Shrubs for Year-Round Interest

We just love incorporating natives into the home landscape, and it’s easier to do than many gardeners realize. Including native plants is an important part of sustaining local pollinators and wildlife. Furthermore, native plants are naturally lower maintenance and pest-resistant, and wow, are they beautiful!

Favorite Native Shrubs

It’s easy to find native shrubs to provide interest in the garden the whole year through, from fresh spring growth to brilliant summer blooms to outrageous autumn foliage to stunning winter structure. Our list offers outstanding selections that will do well in a variety of moisture levels, soil types and sun exposures. Cultivars of these species offer variations in size, form, leaf color and shape as well as flower colors.

  • Sweet Pepperbush (Clethra alnifolia)
    Deciduous shrub, 3-8 feet high x 4-6 feet wide. Fragrant white blooms in July to August. Full sun to part shade, but will tolerate heavy shade. Moist to wet soil, tolerates erosion and clay soil. Use as a hedge, to naturalize or in rain garden. Attracts butterflies.
  • Sweetfern (Comptonia peregrina)
    Deciduous shrub, 2-5 feet high x 4-8 feet wide. Insignificant flower, ornamental and fragrant leaf. Full sun to part shade. Medium moist soil preferred, but also drought tolerant. Use to naturalize or in rain gardens.
  • Silky Dogwood (Cornus amomum)
    Deciduous shrub, 6-12 feet high x 6-12 feet wide. Yellowish-white flowers in May to June followed by showy fruit. Full sun to part shade. Medium to wet soil. Deer tolerant. Good for erosion control. Use as a hedge or in a rain garden. Attracts birds.
  • Winterberry (Ilex verticillata)
    Deciduous shrub, 3-12 feet high x 3-12 feet wide. Showy red fruit in the winter. Full sun to part shade. Medium to wet soil and tolerates clay soil. Tolerates air pollution. Controls erosion. Use as a hedge or in a rain garden. Attracts birds.
  • Mountain Laurel (Kalmia latifolia)
    Broadleaf evergreen, 5-15 feet high x 5-15 feet wide. May-blooming with rose to white flowers with purple markings. Sun to part shade. Medium moist soil. Deer and rabbit tolerant.
  • Spicebush (Lindera benzoin)
    Deciduous shrub, 6-12 feet high x 6-12 feet wide. Fragrant greenish-yellow, flowers and showy fruit. Part shade but can tolerate heavy shade. Medium soil moisture and drought tolerant. Deer tolerant. Can grow in clay soil. Attracts birds and butterflies.
  • Northern Bayberry (Myrica pensylvanica)
    Deciduous shrub, 5-10 feet high x 5-10 feet wide. Showy fruit in the winter. Full sun to part shade. Dry to medium soil moisture. Use as a hedge, naturalize or in a rain garden. Attracts birds.
  • Pinxterbloom Azalea (Rhododendron viscosum)
    Deciduous shrub, 3-5 feet high x 3-5 feet wide. Blooms white to pale pink in May to July. Part shade. Medium to wet soil moisture. Very ornamental and good as a cut flower. Tolerant of rabbits. Attracts hummingbirds and butterflies.
  • American Cranberry Bush (Viburnum opulus ‘americanum’)
    Deciduous shrub, 8-12 feet high x 8-12 feet wide. White lacecap flowers in April to May. Edible fruit. Full sun to part shade. Medium soil moisture. Use as a hedge or in the shrub border. Attracts birds and butterflies.

If none of these suggestions quite meet your preferences for a year-round native shrub, stop in to see our experts for more tips and options – new species and cultivars are always arriving!

top-native-3top-native-1

top-native-2