Author Archives: D.R. Snell Nursery

Blooming Plants: Brighten Your Home & Office

It is no secret that houseplants can beautify your home and office as well as freshen the air, promote relaxation and improve concentration. But if you’re tired of plain foliage and miss the colorful bursts of your annual and perennial flowerbeds, why not opt for flowering plants indoors as well? There are many beautiful bloomers that can brighten up your home and office throughout the year.

Orchids

Orchids are favorite flowers that add an exotic touch to any décor. The most popular varieties for indoor blooming include…

  • Phalenopsis (Moth Orchid) – This favorite selection can continue to spike up to 9 months during the year and is considered the easiest to bloom
  • Dendrobium – Many fragrant varieties in lots of colors, can rebloom 1-4 times per year
  • Cattleya – Large standard variety blooms once per year, miniature varieties can bloom 2-3 times per year, many fragrant varieties, colors and sizes of flowers
  • Oncidium (Dancing Lady Orchid) – Blooms once per year and lasts 6-8 weeks
  • Paphiopedilum (Lady Slipper Orchid) – Blooms once per year with blooms lasting 6-8 weeks, very exotic.

Cyclamen

This popular plant produces a profusion of colorful flowers that bloom for a long time, ideal for adding reliable color and life indoors. Keep cyclamen evenly moist from September through May. Let them dry from June to August, so the tuber can rest and recover from the intense effort of the prolonged bloom cycle. Ideal light is a sunny east or west window. Cyclamen prefer a cool room (60-70 degrees). Feed them from September to May, then stop for the summer months.
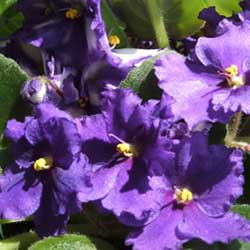
African Violets

These small, robust plants are by far the most popular houseplant and among the easiest flowering houseplant that blooms all year long. Choose from a wide selection of pink, purple, magenta, white and blue options in both double and single blooms. African violets prefer bright, diffused or artificial light. Feed regularly and water from the bottom so as not to get water on the leaves, which could promote diseases and fungus. Be sure to empty any excess water so the roots do not rot.

Kalanchoe

These blooming plants’ flowers last for many weeks. Kalanchoes grow 8-12 inches tall with masses of small four-petaled leaves that are red, orange, coral, gold, yellow and purple. They have thick, waxy leaves with a succulent appearance and can withstand periods of dry soil, making them a good option for beginners or in offices that may be closed for holidays or other periods when the plants may be somewhat neglected. Water when soil feels dry to the touch and drain excess water from tray. Maintain flower color with bright, indirect sunlight daily for at least four hours.

Bonsai

If you haven’t tried it, the art of training a dwarf potted tree is a fascinating hobby. Because the soil around the bonsai plant is limited, these plants need watering almost every day, and sometimes twice a day during the hot summer. We carry a wide selection of starter plants and mature specimens from evergreen selections to tropical varieties. Some will bloom with true flowers, while others – though they don’t produce flowers – have such delicate and pleasing structures that their appearance is every bit as lovely as the most gorgeous bloom.

Not sure which blooming plant will be best for your home or office? Stop in and we’ll be happy to help you choose just the right plant to brighten your space!

blooming-ho-2

blooming-ho-3

blooming-ho

Feeding the Birds

When a bird’s natural plant food has waned or withered away in late winter, a few well-placed feeders can entice a feathered friend to stay nearby. There are four basic types of feeders, but the type of feeder and food it’s filled with will determine which birds will visit. Which do you want in your yard?

Feeder Types and the Birds They Attract

While birds will visit a variety of different feeders, the best options for winter birds are…

  • Tray / Platform Feeders
    A tray or platform feeder with low sides and a wide, open base placed one to three feet above the ground will lure ground-feeding birds like juncos, towhees and mourning doves. Grouse and quail may also visit this type of feeder, and these feeders are ideal for offering food to large flocks of birds.
  • House Hopper Feeders
    Hung from a tree or hook or mounted on a pole, “house” style feeders with seed hoppers and perches on the side will usually entice grosbeaks, cardinals and jays, as well as sparrows and finches. These feeders help keep seed dry and can hold a larger quantity of seed so refills are not as frequent.
  • Tube Feeders
    Long, cylindrical tube feeders suspended in air will bring in an array of small birds, including finches, titmice, nuthatches, siskins, redpolls and chickadees. These feeders may have either mesh-like sides where birds can easily cling, or they may have multiple perches to accommodate more birds. Sock-style feeders are also popular.
  • Suet Feeders
    A cage-like feeder that holds a cake of rich, fatty suet is a bird magnet for woodpeckers, wrens, titmice, nuthatches, titmice, mockingbirds and jays. A standard suet cage can hold just one cake and can be hung from a pole or branch. Larger suet feeders may hold multiple cakes, and some suet feeders are even designed as logs or other shapes to hold suet plugs or balls.

Best Winter Bird Foods

Birds will seldom drop or pick out unwanted seeds if you fill your feeder with only one type of seed rather than a generic mix. Black oil sunflower seeds are the most widely preferred, though white millet is popular for smaller finches, sparrows and ground-feeding birds. A tube feeder containing Nyjer (thistle) seeds will whet the appetite of goldfinches, siskins or redpolls. Jays, chickadees and juncos love peanuts or cracked corn as a treat in a tray feeder. Suet is another fine treat that offers great calories to keep winter birds healthy.

No matter which type of bird feeder you offer or how you fill it, you are sure to enjoy the company of a hungry winter flock. Keep the feeder filled and clean, and the birds will continue to visit all winter long.

Herbal Delights

No matter how cold the temperatures or how deep the snow, you can enjoy the pleasures of herbs this winter season by growing them in your windowsill. Herbs are great for adding zest to any food and are a delicious substitute for salt and artificial flavors. They can also make dinner a visual delight! Add herbs to breads, soups and stews for flavor or use as a lovely garnish. Here are some great selections to try…

Rosemary is a must for the cook. Fresh rosemary is much richer and more fragrant than dried sprigs. Its needle-like foliage has a piney or resinous aroma and flavor. Rosemary is good with any meat or poultry, with stronger tasting fish, and with pizza, breads and potatoes. It is companionable with garlic and citrus flavors. A pleasing apple jelly can be scented with rosemary for a gourmet touch.

Chives, being a member of the onion family, is one of the few flavoring plants that appreciates some fertilizer. The hollow spears should be cut as needed by clipping a few spears just above the ground. It is used mostly as a garnish or final ingredient wherever a light onion taste is wanted, and it won’t overpower your recipes.

Mints are a necessity for herb windowsill gardens. No one would want to be without spearmint and peppermint, and maybe orange mint, for fresh teas and additions to fruit cups and ice cream. Fragrant and luscious, mints also make delightful garnishes for drinks or can be frozen into ice cubes.

Sage is a standby for poultry, breads and stuffings and combines well with corn or apples. Fried leaves are good to nibble. Experiment with different types of sage to enjoy their subtle variations and different flavors.

Thyme, a huge family of small upright, mounding or creeping plants, comes in a variety of flavors. You will find varieties labeled French, English, Common and Lemon, with leaves that may be all green or silver-edged or even variegated with gold. Every herb garden should have some thyme, and it pairs will with lamb as well as in marinades and salads.

Oregano is the hardier cousin of marjoram. It is a familiar flavoring in Italian and Greek cooking, in meats, sauces and of course in pizza. Oregano can be added to salads, used in marinades or mixed in with breads for rich flavor without any butter needed.

When growing your herbs, be mindful of their sunlight needs and keep them away from heating vents that can dry the soil out too quickly. Use organic fertilizers like fish emulsion and seaweed sparingly. Although fertilizers make the plants beautiful to look at, the less fertilizer used on an herb, the better it will taste. Now is a great time to start growing or to add to your culinary herb collection. Winter is the perfect time to start adding zest and flavor to your cooking!

herbal-delights-1

Making a Terrarium

Hold onto your gardening hats, folks! Remember terrariums? A new trend revitalizing this old style is now better than ever. Creating a theme for your terrarium is easier too, with the all the miniatures now available. Remember those skinny-necked bottles and what a hassle they were? New container styles make terrariums easier to plant, simple to maintain and more beautiful in your home.

Style

What is your terrarium’s style? Tropical with ferns, arid with cacti or beach-like with tiny grasses, sand and water-like pebbles? Will you have figures such as fairies or gnomes? To choose the plants, consider the lighting where you plan to place the terrarium. If your gnome home is to be in the corner, consider using a cute fluorescent light or similar illumination to help keep your terrarium’s plants healthy and thriving.

Container Shape and Size

Choose your container and ensure it has enough room for your completed dream. Clear glass allows views of different layers of sand, soil and top dressing, giving your terrarium extra depth. Container shapes include hanging, footed, cylindrical, spherical, even leaning. Multi-sided geometric shapes are popular, as are smooth, curved shapes with a natural flow. If your garden includes tropical plants, consider a container with a smaller opening or a lid to increase humidity for healthier plants.

Don’t forget to consider size – tiny terrariums with just a plant or two are popular and can be hung like ornaments or make great gifts, while larger containers can create an entire microcosm and unique environment for a stunning display.

How to Plant

Planting a terrarium takes a little extra care, but is no more difficult than planting any houseplant.

  1. Put an inch or two of small gravel, pebbles or expanded clay pellets into the container, providing a drainage base. Mixing in several tablespoons of horticultural charcoal prevents odors. If the container is large enough, layer other colors or sizes of pebbles or sands to create visual interest when viewed from the side.
  2. Soil goes in next. Many plants grow well in light soils mixed with peat moss and vermiculite or perlite. Moistened coir is another option. Alternatively, consider special prepared soil mixes for African violets, succulents or cacti.
  3. Create a landscape plan by first arranging the plants on the tabletop to determine where they will be placed in the container, taking into account how the plants may touch the sides or top of the container.
  4. Plant the largest plant first. Dig a small hole, place the plant, and firmly tamp the soil around it. This is very important to stabilize the plants and remove air pockets. If the space is tight, smaller plants may be able to help stabilize larger plants.
  5. After placing the plants, you may want to top-dress with decorative pebbles or bark. Sand looks great around cacti. This is also the time to place fairies, cottages, twigs, larger stones, marbles and other decorative items in your terrarium to create the desired theme.
  6. When everything looks good (look at it from all sides and angles), use a small artist brush to clean any loose dirt or sand away from the sides and leaves.
  7. Use a mister to water the plants. Because the container acts as a small biosphere and much of the moisture is recycled, a little water lasts for quite awhile. Do not overwater your terrarium or the plants may rot, and replacing them can be a challenge.

Place your terrarium in its new location and enjoy its beauty and your accomplishment!

Preserving the Harvest

Was it a bumper crop this year? Do you have tasty fruits, vegetables and herbs overflowing your storage? Now that the harvest is in, the decision needs to be made as to what to do with the abundance.

Years ago, homes had root cellars to store winter squash and root vegetables such as onions, potatoes and carrots to keep them cool and dry for several weeks. As more homes refinish basements into living spaces and more urban gardeners expand their harvest, however, it may be difficult for gardeners to store their harvest this way. So, what can they do?

Here’s a quick little table to help:

Vegetable Store Freeze/Blanching Time Can Dry Pickle
Beets X (2 min) X X X
Broccoli (3 min) X X X
Brussels sprouts (3 min) X X X
Cabbage (90 sec for wedges) Pickle first X X
Carrots X (5 min) X X X
Cauliflower (3 min) X X X
Celery (3 min) X X
Fennel (1/2 min) Pickle first X
Horseradish X (shred) Prepare as sauce X X
Kohlrabi (3 min) Pickle first X X
Onions X (raw) Pickle first X X
Parsnips X (2 min) X X X
Potatoes X (cooked) X X X
Rutabagas X (2 min) X X X
Sweet Potatoes/Yams X (cooked) X X X
Turnip X (2 min) X X X
Winter Squash X (cooked) X X X
  • Storing: Only store mature and perfect vegetables. If there are soft spots or bruises, eat immediately or preserve. Leave several inches of stems on winter squash. It’s important to maintain temperatures between 32-40⁰ Fahrenheit with good air circulation and ventilation. To reduce spoilage, the humidity should be between 85-95 percent.
  • Freezing: Freezing maintains nutrients, flavor and texture. Most vegetables require blanching (cutting into pieces, a boiling water bath [see times above], followed by immersion into very cold water) prior to putting into freezer bags or containers in the freezer. Maintain a temperature of 0⁰ Most vegetables will store well in the freezer for up to 12 weeks.
  • Canning: Best method for vegetables with high water content such as fruits and tomatoes. Hot water baths or pressure cookers seal the contents in sterilized jars. Most vegetables are low acid foods and require using a pressure cooker. Use cleaned, fresh and tender vegetables. Follow all pressure cooker instructions carefully.
  • Drying: No special equipment required. Most people use ovens or dehydrators. It’s important to have good air circulation and all vegetables are cleaned and not bruised. Blanching in a hot water bath increases quality and cleanliness. Adding 1/4 teaspoon of citric acid to each quart of water will reduce darkening and discoloration.
  • Pickling: Used around the world to preserve foods, pickling also includes relishes and fermentation. Examples include Kim-chi, pickles, sauerkraut and chutneys. Follow all recipes carefully. Most use vinegar to stabilize acidity and prevent bacteria. Some recipes will suggest canning to preserve the product, others will recommend refrigerator or crock storage.

Have specific questions? The National Center for Home Food Preservation has many online publications to assist you.


Winter Vegetables on the Table

Winter marks a seasonal change. Our bodies seem to crave deeper, more tantalizing, richer tastes rather than light, bright, fruity flavors of summer. Harvesting vegetables in the late fall, and sometimes into the winter, presents us with bounty for slow, simple and savory cooking. All winter vegetables may be boiled, roasted, grilled, stewed, sautéed, steamed or eaten raw.

Which Vegetables Are Winter Vegetables?

Winter vegetables are generally considered those that are either harvested late in the season or have the capability of being kept for several weeks or months without losing their flavor, texture and nutritional value. Which of these will grace your table?

The cole, or cruciferous, vegetables such as broccoli, Brussels sprouts, cabbage, cauliflower, turnips and kohlrabi rank highly for many nutrients including vitamin C, soluble fiber and other nutrients with anticancer properties. Interestingly, boiling seems to reduce the potency of these nutrients, but other cooking methods don’t.

Root crops, including beets and carrots, sustain life around the world. Beets provide folate, nitrates and manganese in dishes such as borscht and pickled beets. Carrots contain diverse vitamins including A, C, K and B6 and antioxidants from carotenoids. Interestingly, recent research suggests many people prefer the flavor of steamed carrots to boiled.

Fennel, with its anise flavor, jazzes up meals throughout the world but is a favorite in Mediterranean and Italian cuisine. It tops nutritional lists with its antioxidant benefits. Try some raw in salads and appetizers.

Celery, related to fennel, adds a distinctive crunch when used in salads as a raw ingredient or a stronger flavor to soups and stews. With a mild taste, celery is versatile in a wide range of dishes, including mashes, stuffings and roasts.

Potatoes and sweet potatoes, long associated with the typical American holiday meal, contain many healthful benefits. According to research, boiling or steaming sweet potato provides the most health benefits; the phytochemicals in them rival that of broccoli. Roasting or baking potatoes is a healthy way to enjoy them, provided you are sparing with the toppings.

Winter squashes, from acorn to pumpkins, also serve as healthy sources of carbohydrates. Because 90 percent of the calories are starch-related, people are surprised at recent studies proving the antioxidant, anti-inflammatory and insulin-regulating effects of winter squash. Additionally, the roasted seeds make a delicious and healthful snack.

Winter Vegetable Recipes to Savor

Have you ever wondered how to roast vegetables? It’s easy! Just wash the vegetables, cut into 1″x1″ cubes, and place in mixing bowl. Drizzle over a few tablespoons extra virgin olive oil and mix to cover all pieces. Place as a single layer in a cookie or roasting pan. Sprinkle with salt and pepper and cook at 375⁰ Fahrenheit for approximately 45 minutes or until the desired texture is reached. Jazz it up with cinnamon, garlic, curry, rosemary or any other favorite spice or seasoning mix.

Here are some other recipes to bring these wonderful winter vegetables to your table. Bon appétit!

Roasted Winter Squash Seed and Cheese Ball Appetizer

Step 1: Roast winter squash seeds by cutting the winter squash in half and removing the seeds and stringy “gunk.” Put into a bowl half filled with water and rub between your hands to separate the seeds from the strings. Rinse the seeds again and spread out on a cookie sheet. Use a hair dryer or place in 150⁰ Fahrenheit oven to dry. Stirring every 10 minutes reduces drying time and ensures even drying.

Step 2: When dry, place seeds in bowl and combine with choice of seasonings. Mix thoroughly. Return to cookie sheet. Place in 275⁰ Fahrenheit oven for 10-20 minutes. Watch closely to prevent burning. When cool, chop finely to coat cheese ball.

Seasoning ideas

  1. Latino: 4 Tbs. melted butter, 2 tsp. chili powder, 1 tsp. oregano
  2. Asian: 4 Tbs. melted butter, 2 tsp. ground ginger, 1 tsp. hot mustard, 1 tsp. honey
  3. Holiday: 4 Tbs. melted butter, 2 tsp. cinnamon, 1 tsp. nutmeg, 2 tsp. sugar
  4. Use your imagination!

Step 3: Make cheese ball.

Ingredients:
2 pkg. (8 oz. each) softened Neufchatel cheese
1/2 cup shredded sharp cheddar cheese (Low fat)

Directions:
Beat Neufchatel and cheddar in small bowl with mixer until well blended. Refrigerate 1 hour. Shape into ball. Press seasoned winter squash seeds onto cheese ball.
Serve with complimentary crackers, tortilla chips, pretzels or flatbread.

Winter Squash Casserole

(serves 2)

Ingredients:
2 Cups winter squash, peeled and cut into 1-inch cubes
3 Tbs. extra virgin olive or macadamia nut oil
1 tsp. orange juice
1 tsp. lemon juice

Directions:
Steam squash chunks, covered, for 7-8 minutes, until just tender
Mix remaining ingredients, pour over squash in bowl
Toss while still warm. Serve.

Other Ideas:

  • Cook 1/2 C chopped onion with squash, or
  • Add fresh herbs such as basil or rosemary to liquid dressing, or
  • Sweeten with 1 tsp. cinnamon and 2 tsp. honey, or
  • For Asian flavoring, add 1 Tbs. minced fresh ginger, 2 tsp. soy sauce

Super Easy Grilled (or Baked) Cauliflower

  1. Remove the leaves. Cut the head in two, core the stem. Place both on large piece of heavy-duty foil.
  2. Melt 1/2 Cup butter with 2 tsp. garlic salt and 2 tsp. lemon pepper.
  3. Drizzle half of butter mixture over each half and sprinkle each with 3 Tbs. parmesan cheese
  4. Rejoin the two halves and drizzle remaining butter mixture on the outside.
  5. Fold foil around, creating a ball.

Cook at 350⁰ Fahrenheit for approximately an hour or until soft. Delicious!

veg5

veg1

veg2

veg8

Plant a Tree This Fall

There are so many reasons to add a new tree to your landscape this fall that it’s hard to find a reason not to.

Just think about it, trees will…

  • Beautify the Environment
    Trees add texture and color to the landscape. They soften the harsh lines of buildings and driveways, while their foliage and blooms add seasonal color changes and variety.
  • Stabilize Soil
    Tree roots prevent soil from blowing or washing away, minimizing erosion and providing protection for the surrounding landscape.
  • Provide Wildlife Habitat
    Trees provide shelter and food for birds and numerous small animals, including squirrels, raccoons, insects and more.
  • Make Food
    Many trees provide fruits, nuts, seeds, sap and berries for human consumption. Wildlife will also rely on the food provided by trees.
  • Create Oxygen
    Through photosynthesis, trees take in carbon dioxide, carbon monoxide, sulfur dioxide and other poisons from our air and release pure oxygen for us to breathe. One tree can produce enough oxygen for 10 humans for one year!
  • Filter the Air
    Trees act as giant filters trapping dust and pollution particles with their leaves and bark until the rain washes the particles away.
  • Cool the Air
    Air will remain several degrees cooler in the shade of a tree canopy. This is accomplished by not only by blocking the sun’s rays but also through transpiration. Tree leave transpire, or release moisture, which cools the surrounding air. A large tree can release as much as 400 gallons of moisture from its leaves daily.
  • Reduce Utility Bills
    Deciduous trees planted on the south and southwest sides of a home will shade the structure during hot summer months and reduce air conditioning or other cooling needs. In the winter, with the leaves fallen, the sun is able to warm the structure, reducing heating bills.
  • Reduce Noise Pollution
    Strategically planted, trees can dramatically reduce the volume of unwanted noise from loud neighbors, nearby businesses or car traffic.
  • Hide undesirable views
    Purposefully sited, trees can camouflage unattractive views and create privacy, providing a natural sanctuary in your yard.

In our area, fall is just about the best time of year to purchase and plant a tree. The soil is warm, air temperature is cool and morning and evening dew increase available moisture to nurture a new tree. Stop in and see our extensive collection, and we can assist you in choosing the tree that is perfect for your landscape and lifestyle needs.

PlantATree_2

PlantATree_3

PlantATree_1

Save

Fall Lawn Care

Fall is the best time of the year to overseed your existing lawn or establish a new lawn. If your lawn is a bit thin, has bare patches or needs good care, now is the time to take care of it so it can become thoroughly established before warm temperatures arrive in spring.

Overseeding A Weak Lawn

A weak lawn may have thin or scraggly patches, seem overrun with weeds or have bare patches that are difficult to keep green and lush. Overseeding can help eliminate these problem areas and create a more consistent, luxurious lawn.

  1. Spray broadleaf weeds with a selective herbicide and wait 2 weeks for the weeds to disappear. Several treatments may be necessary if the yard is thick with weeds.
  2. Take a soil sample of your lawn to determine the pH. A garden extension service can help determine pH levels, or home test kits are available.
  3. Mow shorter than normal and rake clean to remove unnecessary debris that may keep seeds from reaching the soil.
  4. Core aerate if you have compacted soil or heavy thatch. Remove the cores and dispose of them properly to keep the soil light and airy for seeding.
  5. Apply starter fertilizer and lime if determined to be needed by the pH test, or choose a grass type that will thrive in your soil’s conditions.
  6. Dethatch your lawn if thatch is thicker than ½ inch. This can be done with heavy raking or a special dethatching rake may be necessary in extreme cases.
  7. Overseed with the proper seed. If core aerating, lightly topdress with topsoil or humus.
  8. If needed, cover the freshly seeded area with netting or hay to discourage birds or other wildlife from consuming the seed before it grows.
  9. Water daily until grass has germinated, then soak once a week to encourage deep root growth.
  10. Fertilize in late fall with fall fertilizer.

Seeding A New Lawn

If you have no existing lawn or the entire ground is overrun with nothing but weeds, it may be best to start from scratch and create the lawn of your dreams.

  1. Kill existing vegetation with nonselective herbicide. If you want to preserve nearby trees or shrubs, take steps to protect that vegetation from the treatment.
  2. Take a soil sample of your lawn to determine the pH. A testing kit can provide a good pH estimate, or a gardening center or garden extension service can provide a more precise evaluation.
  3. Prepare soil by breaking up the surface with a rake or spade using a crisscross pattern. All large lumps should be broken up, and any large rocks should be removed.
  4. Broadcast starter fertilizer, lime and gypsum as determined by the pH test. This will provide a nutrition boost for fresh seeds.
  5. Spread topsoil or humus to a ½ inch depth for appropriate planting.
  6. Rototill to a depth of 4 inches and grade smooth. This will mix all the top layers together for uniform soil and nutrition, ensuring even turf growth.
  7. Sow proper seed and mulch lightly with salt hay to control erosion and conserve moisture.
  8. Water daily until grass has germinated, then soak once a week to encourage deeper root growth to resist droughts and repel weeds.
  9. Fertilize in late fall with fall fertilizer to provide nutrition throughout the season.

Which Seed?

Not every lawn will thrive with the same type of grass seed. Allow our staff to help you select the seed that best suits your needs, soil type and planting conditions. Apply at the recommended rate and incorporate into the top ¼” of soil. Do not bury the seed or it may not germinate evenly.

No matter what the condition of your lawn, fall is the best time to take steps to help it rejuvenate so you have an amazing lawn to enjoy in spring.

FallLawn_2FallLawn_1

Save

More Than Just Mulch

Not only does mulch add a decorative finish to your flower beds, creating a canvas to showcase colorful blooms, it also helps keep soil cool and moist, thus reducing the need for manual watering. The addition of a 3 inch layer of mulch atop your garden soil will also contribute greatly to weed suppression.  Including an application of a pre-emergent herbicide or corn gluten meal will discouraged weed seeds from germinating and growing. And, I’m sure we can all agree, weeding is a chore nobody likes to do!  So, which mulch should you use?

Pine Bark Mulch – Pine mulches is one of the best types of mulch for plants. As it breaks down it enriches the soil with nutrients.

Shredded hardwood – This is by far the most popular mulch. It has a dark color and knits together well so that it does not easily wash away.

Cocoa Mulch – Cocoa mulch provides a nice clean look with a delicious chocolate scent. It is, however, not recommended if you own a dog.

MULCH FACTS:

  • 1 cubic yard of shredded hardwood mulch will cover 150 square feet of area to a depth of 2 inches. We recommend a 2 to 3 inch depth to receive the best results.
  • There are 27 cubic feet in 1 cubic yard.
  • Compost is an excellent soil amendment but is not a replacement for mulch.
  • When applied correctly, mulches improve garden appearance, reduce the growth of weeds, prevent soil moisture evaporation and maintain consistent soil temperatures.
  • When fully decomposed, mulches will improve the soil structure and add nutrients back into the earth.

mulch_1mulch_2

Damping Off Disease

Arguably the most common, and certainly the most frustrating, seedling disease has to be damping off. Damping off is a common term used for several fungal diseases that cause sudden seedling death. Seedlings get very thin where the stem meets the soil. Young seedlings will then fall over, shrivel up and die.

The wisdom of Ben Franklin applies here; “an ounce of prevention is worth a pound of cure”. To prevent damping off you must:

  • Sterilize your containers with a 1:10 bleach solution
  • Use a sterile seed starting mix
  • Plant seeds on the soil surface and top with vermiculite, milled sphagnum peat moss, chicken grit or sand
  • A one time sprinkling of cinnamon or charcoal on the soil surface will act as an anti-fungal agent
  • Water containers from below allowing the surface of the soil to dry slightly between waterings
  • Provide good air circulation around seedlings with a fan
  • Spray seedlings with an ounce of cooled, strongly brewed chamomile tea diluted in a quart of water
iStock_000028335442Medium-200x300