Author Archives: D.R. Snell Nursery

Delightful Daffodils

Spring flowering bulbs are a must for every garden. They provide cheerful early-season color at a time when it is most needed, both in the landscape and by our winter weary souls. Daffodils are some of the most delightful Spring flowering bulbs! What makes them so delightful is their ease of care, diversity in their flower color, size, shape and fragrance, resistance to pests and disease, and their carefree ability to increase and return year after year, with little effort.  

Daffodil Selection

Did you know that there are over 32,000 registered cultivars of daffodils? This number gives us some indication of the immense diversity of this flowering bulb with some varieties being easier to find than others. As you become more familiar with, and addicted to delightful daffodils, you will never get tired of adding more of these intriguing bulbs to your collection, possibly seeking out a few hard-to-find ones as well.

Note: All daffodils are narcissus, but not all narcissus are daffodils. For the sake of simplicity, we will refer to all narcissus and daffodils mentioned in this article as daffodils. Their care is the same and separating them will only complicate matters.  

Daffodils require a cold period to bloom. Most daffodils will flower best in USDA Hardiness Zone 7 and lower. If you live in USDA Hardiness Zone 8 and higher, there are some daffodils that will do well in your area, or you may purchase pre-chilled bulbs. It will help to work with your local garden center to determine which daffodils do best in your particular area.

All daffodils bloom in the Spring. Within the Spring season, some will bloom early, mid-season, and late. Knowing when a particular daffodil flowers, will allow you to plant varieties for a succession of blooms to extend the whole season. As you begin growing daffodils, it may be easiest to choose some of the most popular and easy-to-find varieties

Early-season Bloomers

  • Barrette Browning – white petals with small orange cup, 1 to 2 feet tall, lightly fragrant. 
  • Rijnveld – golden yellow, 15 inches tall, delightfully fragrant.
  • Tete a Tete – buttercup yellow, multi-flowering, miniature at 6 to 8 inches tall, fragrant.

Mid-season Bloomers

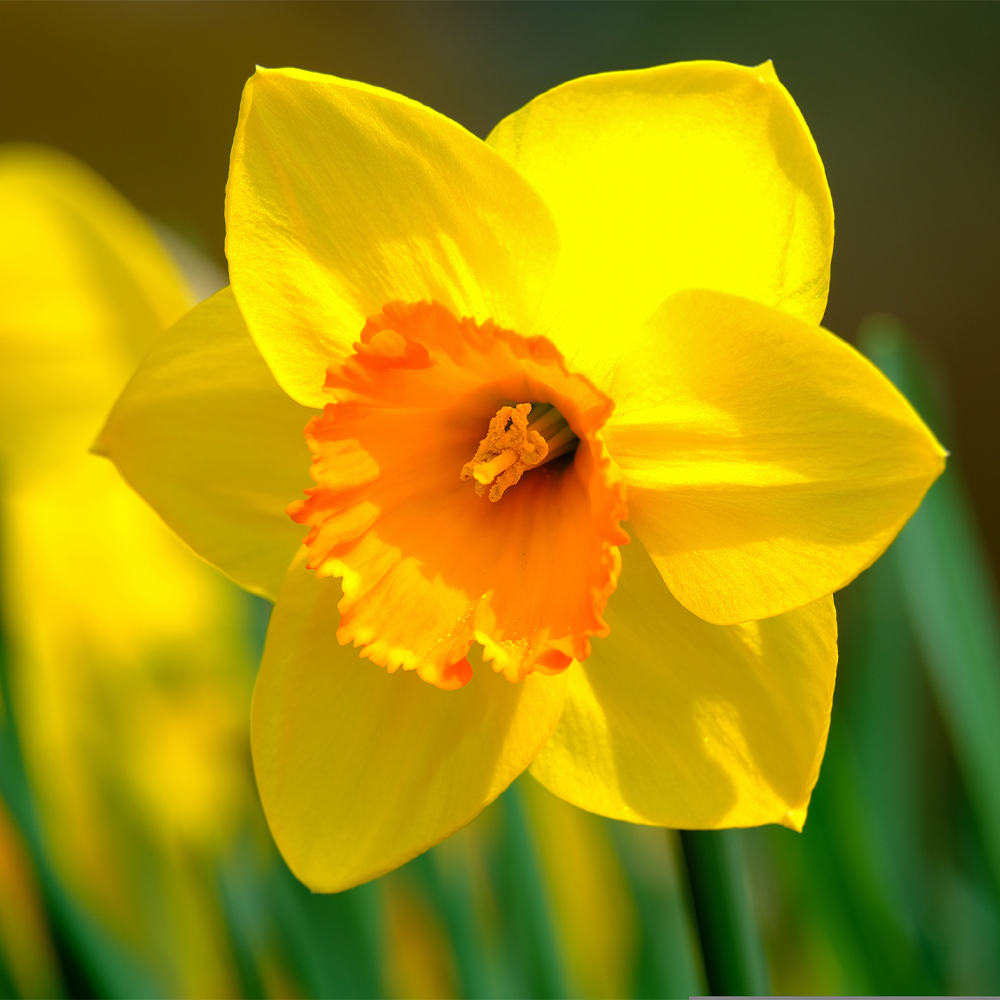
  • Dutch Master – large, golden-yellow daffodil, 1 to 2 feet tall, lightly fragrant.
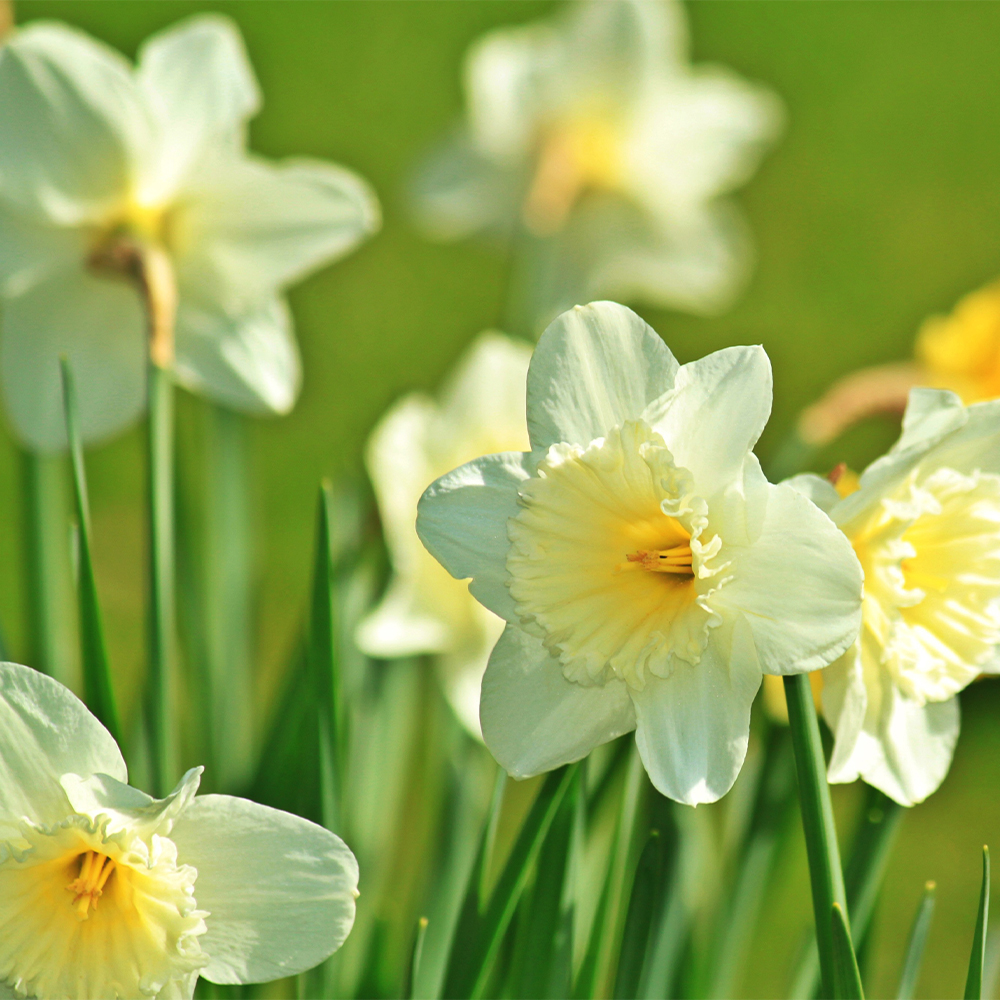
  • Ice Follies – creamy white petals with a pale-yellow cup, 20 inches tall, lightly scented. 
  • Pink Charm – ivory petals with a coral-colored cup, 18 inches tall, fragrant.
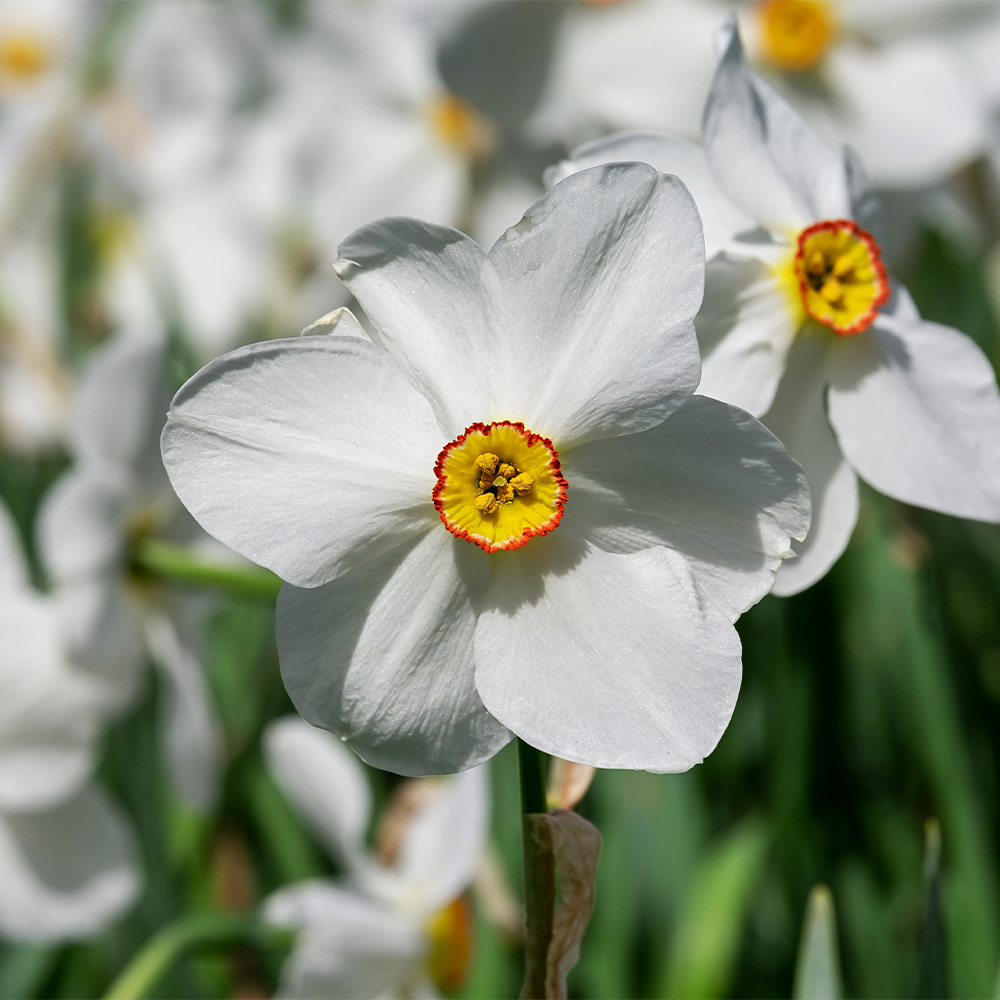
  • Professor Einstein – snow white petals with a reddish-orange cup, 16 to 18 inches tall, fragrant.

Late-season Bloomers

  • Acetaea – pure white petals with a small gold cup rimmed in red, 1 to 1 ½ feet tall, fragrant.  
  • Cheerfulness – small flowering, multi-flowering and multi-stemmed, white double flowers with pale yellow flecks, 1 to 2 feet tall, very fragrant.
  • Tahiti – large, double flowering daffodil, bright golden-yellow with bright orange ruffled cup, 16 inches tall, fragrant. 
  • Thalia – downward facing, pure white flowers with 2 to 3 flowers per stem, 1 foot tall, very fragrant.

Planting Daffodils

Daffodils are purchased and planted in the Fall for Spring blooms and are extremely easy to plant…. easy as dig, drop and done!

  • Plant daffodils in a sunny to part-shady, well-drained site.
  • Daffodils may be planted in single holes, rows, or in groupings. 
  • Place daffodil bulbs 6 inches deep, pointy side up.
  • If the native soil is of poor quality or does not drain well, consider amending the soil with a quality compost.
  • Add bone meal to the planting area, to stimulate strong root development, before backfilling the area or holes with soil. 
  • No need for deer or rodent protection, these bulbs are pest proof!
  • Water area after planting daffodils and wait for Spring!

With such wide diversity in one group of flowering bulbs, considerable beauty, ample fragrance, significant bloom time, and substantial pest resistance, wouldn’t you agree that daffodils are delightful?

Daffodils

Daffodils

Daffodils

Daffodils

Fall Chrysanthemums

No flower is more iconic of autumn than the chrysanthemum, and these beautiful mounding perennials are ideal for fall flowerbeds, pots, window boxes, borders, and many other uses. How will you get creative with chrysanthemums this fall?

Why We Love Chrysanthemums

Just when many other flowers are fading at the end of summer, chrysanthemums, or mums, are coming into their glory with a range of stunning autumn colors. Depending on the cultivar, these plants sport yellow, white, red, orange, bronze, pink, peach, wine, purple, and bicolored blooms. The flowers range from small, button-like blossoms to larger blooms reminiscent of daisies. Mum blooms are long-lasting when cut and they’re just as lovely in floral arrangements and bouquets as they are planted in containers, flowerbeds, and the landscape. This makes mums extremely useful for all manner of autumn décor.

Chrysanthemums are native to east Asia and northern Europe and were first domestically cultivated in China nearly 600 years ago. Today, there are more than 20,000 chrysanthemum cultivars worldwide. They are deer- and rabbit-resistant, making them a hardy option for landscaping beds, and with a bit of thoughtful care, these tender perennials can be a wonderful addition to any flower garden or fall containers.

Caring for Chrysanthemums

The hardiness of chrysanthemums depends on the cultivar as well as the local climate and even the microclimate in your landscape. These flowers prefer well-drained, rich soil with a neutral pH, so it is best to use a good quality potting soil in containers. When planting chrysanthemums in the garden or landscape, mixing compost or peat moss in the planting hole will help increase drainage and nourish the soil to promote the best blooms. A good rule of thumb is that if soil is good for vegetables, it will also be good for mums – making them a wonderful choice to refresh a garden after the summer harvest has finished.

Chrysanthemums grow best in full sun requiring a minimum of six hours per day. If mums are planted in containers, consider using a mobile plant cart or a stand with casters so  that the pots may be moved to brighter areas, if needed, as the season progresses.

Chrysanthemums prefer evenly moist, but not soggy, soil. Because of their thick, mounding habit, it is best to water mums from below suing a soaker hose or irrigation drip system in garden beds. In pots, mums should again be watered from below the plant but above the soil line. A watering wand will make this job direct and easy. Be sure to drain excess water from saucers after watering so the roots do not remain continually wet.

Fertilizing chrysanthemums every month through the spring and early summer, with a balanced fertilizer, will help them grow and bloom well, but if mums are planted in the Fall, they should not need extra feeding as long as they were planted in rich, nutritious soil. Deadheading spent blooms by pinching them back can encourage more flowering and help mums maintain their compact, mounding habit.

Decorating with Fall Mums

Chrysanthemums are a beautiful choice not only in the garden, but are equally lovely in welcoming porch pots, deck or patio containers, or even small indoor pots and arrangements. Add an extra touch of fall with rustic containers, such as wine barrels, baskets, or terra cotta pots, or glam up your mums in hammered copper or bronze pots that will accentuate their color. A burlap ribbon or bow can be a charming accent, and you can give more seasonal flair to mum arrangements or flowerbeds by adding pumpkins and gourds as fun decorations. Indoors, use small pails or pots for petit mum arrangements, or add them to larger arrangements with grain sprigs, dried pods, colorful leaves, or twists of grapevine for additional texture.

Fall chrysanthemums can be a pleasant burst of autumn color, whether they are part of the landscape or are used in containers, pots, or arrangements and we carry a wide selection to make your fall home suit the season!

Growing Garlic

Richly flavorful and packed with health benefits, garlic is a great ingredient for all your favorite savory dishes. Growing garlic is very easy and helps you keep a ready supply of this root vegetable (often also referred to as an herb or spice) on hand for quick access and instant flavoring.

Health Benefits of Garlic

Garlic, which is related to onions, shallots, and leeks, has many documented health benefits, making it a worthwhile addition to your diet. This bulb vegetable is segmented into cloves, and may yield 10-20 cloves per bulb. Just a clove or two added to different dishes can…

  • Boost immune function, minimizing colds and other minor ailments
  • Reduce blood pressure to improve cardiovascular health
  • Lower bad cholesterol levels and the risk of heart attack or stroke
  • Reduce bone loss risk, particularly in older women
  • Lower inflammation to improve arthritis and joint function

The health benefits of garlic are so well known that the plant has featured prominently in the medical treatments of different cultures for centuries, including the ancient Babylonians, Egyptians, Greeks, Romans, and Chinese. Today, many doctors continue to promote garlic as part of a healthy diet.

Tips for Growing Garlic

Fresh garlic has the most health benefits and is the most flavorful. It’s easy to grow garlic either in the garden – it is resistant to both deer and rabbits, making it ideal for borders to protect other produce – or in kitchen pots for easy access for all your cooking. To make the most of growing garlic…

  • Choose organic or locally grown garlic to grow. These cloves won’t have chemical treatments that could inhibit growth, and you will be able to monitor exactly what care your garlic receives.
  • Opt for hardneck garlic in northern climates because it is hardier, whereas softneck garlic can easily be grown in mild climates. If you will grow garlic indoors, either variety is suitable.
  • Choose large, firm cloves without any signs of damage, softening, or bruising for the best growth and largest crop to harvest.
  • Provide a cooling period of 6-8 weeks in the refrigerator for hardneck garlic, which requires a dormant period for optimal sprouting. Softneck garlic does not need as much cooling.
  • Use a pot at least eight inches deep so cloves have plenty of room to develop, and the pot should have abundant drainage holes to prevent root rot.
  • Space cloves at least 3-4 inches apart, or plant just one clove in each pot so the bulbs have adequate room for full development.
  • Use organically rich potting soil, or amend garden soil with compost to nourish young garlic. The soil should be loose and well-draining so garlic bulbs aren’t cramped.
  • Leave the papery skin on cloves for planting, and position cloves pointy-side up, 3 inches down into the soil. Cover the soil with a light layer of mulch or straw for protection.
  • Position garlic where it will receive 6-8 hours of sunlight per day. Indoors, a south- or west-facing window is ideal, or use a supplement grow light to help garlic grow best.
  • Feed garlic carefully, using natural fertilizer, compost, or a high-phosphorus blend specially formulated for larger, healthy bulbs.
  • Water garlic well. The soil should be uniformly moist but not overly soggy, or the bulbs will rot and be unable to flourish.
  • If temperatures drop, protect garlic pots by wrapping them in insulating bubble wrap, carpet, or straw bales. For garden garlic, a layer of mulch will help keep soil temperatures even.

Harvesting Your Garlic

Garlic is slow-growing and will take 7-9 months before fresh bulbs can be harvested. When approximately 50-70 percent of the green tops of garlic plants begin to turn yellow or brown, the bulb is mature and ready to harvest. Use a hand rank or garden fork to carefully loosen soil around the garlic, gently lifting the bulb. Avoid bruising, scratching, or breaking the bulb, which would cause it to rot.

Gently wipe off excess dirt from the bulb, but leave the paper covering intact. Trim off the roots and stalks, and place the fresh bulbs loosely in paper bags in a cool, dry spot for 1-2 weeks. Air circulation should be good to cure the bulbs evenly, and garlic should be stored in a cool, dry place until it is ready to use, or until the best resulting cloves have been dormant long enough to plant and start the cycle over again for even more fresh garlic to enjoy.

Creating a Low-Maintenance Landscape

Looking for a landscape design that delivers curb appeal without demanding your weekends? It might be time to discover the benefits of decorative stone! Stone, rock, and gravel offer practical, polished solutions that minimize upkeep, maximize style, and provide significant long-term savings. If you’re eager to take yard maintenance off your to-do list without sacrificing an attractive outdoor space, you’re in the right place! D.R. Snell is here to guide you through everything you need to know about creating a stunning, low-maintenance landscape with rock.

Why Choose Rock?

Decorative rock landscapes go far beyond simple aesthetics. When you invest in a rock-based design, you’re choosing function, longevity, and a welcome break from repetitive yard work. Here are some core reasons why more property owners are switching to rock:

Long-Lasting Impact

Unlike wood mulch, which decomposes and demands frequent replenishing, decorative stone persists for five years, a decade, or even longer. Rock holds its color, resists breakdown, and keeps your yard looking consistent year after year. This translates into more time and money saved on outdoor upkeep.

Excellent Weed Suppression

When properly installed over quality landscape fabric, decorative rock forms a powerful physical barrier that blocks most weeds from emerging. This simple step reduces your need for herbicides and slashes your time spent on hands-and-knees weeding.

Minimal Watering

While organic mulch can help retain moisture, it often requires maintenance and doesn’t reduce the need for watering as much as you might think. Rock needs no watering at all. When paired with drought-tolerant plants, such as succulents, or xeriscaping, a rock landscape becomes a water-efficient solution offering both immediate and long-term environmental benefits.

No Decomposition or Pest Risk

Mulch is organic, which means it breaks down over time and can invite termites, ants, and pests. Rock, on the other hand, never decomposes, attracts fewer pests, and stays put even during heavy storms or wind. This results in a cleaner, more predictable landscape.

Fire Resistant & Durable

Decorative stone adds a layer of fire resistance to your property, which is especially critical in wildfire-prone regions. Rocks don’t burn, and they serve as a natural buffer near outbuildings, fences, or homes.

Where to Use Rock?

At D.R. Snell, we often hear customers ask, “Where exactly should I use decorative rock?” The answer is almost anywhere! Rock is one of the most versatile materials in landscaping, offering beauty and durability in every corner of your outdoor space.

Long-Term Garden Beds

Start by replacing mulch in your permanent garden beds. Decorative stone stays in place longer, resists fading, and won’t break down like wood chips, making it a significant upgrade around shrubs, trees, and perennials.

Patios, Paths, & Seating Areas

Rock is also ideal around patios, along walkways, and under outdoor seating or play areas where grass struggles to grow. It provides a smart, low-maintenance solution that maintains high curb appeal. It also performs beautifully in high-traffic zones, such as front entrances, signage beds, or along driveways, especially where you want a tidy, professional look without constant upkeep.

Types of Landscape Rock

With such variety in shape, color, and texture, landscape rock is more than just functional—it’s a stunning design element. Some popular options include:

  • River Rock: Smooth, rounded stones available in multiple colors and sizes. Perfect for naturalistic designs, dry creek beds, and defining garden borders.
  • Crushed Limestone: Clean and tightly compacting, making it ideal for driveways, walkways, and fire pit zones.
  • Pea Gravel: Small pebbles that provide comfort underfoot. Excellent for patios, playgrounds, or paths.
  • Slate Chips: Angular and modern, often used for high-contrast, contemporary beds and commercial plantings.
  • Decomposed Granite: A firm, drainage-friendly surface that packs tightly for paths, patios, or even outdoor seating areas.
  • Lava Rock: Lightweight, porous, and bold in color. Offers excellent drainage and a distinctive aesthetic for specific applications.

Selecting the right rock can enhance both function and visual appeal, so consider the colors and textures that harmonize with your home’s exterior or business brand.

Maintenance Tips

A landscape built with stone offers impressive reductions in maintenance, but a little effort goes a long way toward keeping it pristine. Consider these proven tips:

  • Install High Quality Landscape Fabric: Always start with a professional-grade fabric beneath the stone. This keeps weeds at bay, allows rainwater through, and prevents rocks from mixing with the soil below.
  • Refresh the Surface Layer Occasionally: Over time, tracks and settling may cause heavily trafficked areas to thin out. Adding a fresh top layer every few years will restore uniformity and color vibrancy.
  • Use Proper Edging for Containment: Edge beds with steel, concrete, or stone borders to prevent rock migration into lawns or other planting areas.
  • Keep Debris Under Control: Use a blower or light rake to clear leaves and organic matter in fall and spring.
  • Apply Pre-Emergent Herbicide: For added security against weeds, treat beds with pre-emergent product once or twice a year, or as needed.
  • Rinse Rocks: If dust or mud builds up, rinse with a garden hose or use a pressure washer on the lowest setting to restore their natural look as needed.

How to Select the Right Materials

How does decorative stone compare with organic mulch or a turf-heavy yard? Here’s a breakdown:

Material Maintenance Level Best Applications Longevity
Rock Very Low Permanent Beds 5 – 10+ years
Mulch Moderate Flower Beds
Annual Gardens
1 – 2 years
Turf High Play Areas
Lawns
Dog Runs
Ongoing

If your goals include lasting impact, hassle-free ownership, or improved property value, rock is typically the standout choice.

Stunning Results with Minimal Effort

A well-designed rock landscape offers lasting beauty with minimal work. The right mix of stones can add dynamic texture, highlight architectural features, and give your property a cohesive, professional appearance. By making smart choices up front, you can achieve eye-catching curb appeal and enjoy true low-maintenance living for years to come.

D.R. Snell provides an extensive range of landscape stone, from classic river rock to dramatic granite chips. Our staff is ready to help you calculate quantities, select complementary rock types, and even assist you with installation. Whether you’re revamping a single bed or tackling a multi-acre project, we’re here to help every step of the way.

Audition Some Autumn Bloomers

Extend the beauty of your garden with vivid autumn-blooming perennials. When you think of fall-blooming plants, don’t stop at mums – there are many perennials that can add color to your yard at this time of year.

Top Autumn Bloomers

While there are different autumn-blooming perennials for different growing zones and climate conditions, some of the most popular and widespread options include…

  • Fall Daisies
    For fall daisies (besides daisy mums!) grow Boltonia or Nippon Daisy. Boltonia is a tall (3-4′) grower, suitable as a background plant. White or pink daisies are borne in profusion atop fine grey-green foliage. The Nippon Daisy (Chrysanthemum nipponicum) is covered with large crisp white daisies in October. Both love lots of sun and make excellent cut flowers.
  • Autumn Sedums
    Bold-foliaged sedums provide texture as well as color in a sunny place. Sedum ‘Autumn Joy’ is the most well known. It has coppery-pink flower heads. Sedums ‘Brilliant’ and ‘Stardust’, with soft pink and white flowers respectively, are also attractive. For a totally different color combination plant sedum ‘Vera Jameson’. It has gray-purple foliage with rose pink blooms and looks stunning when planted with Blue Fescue, Artemesia Silver Mound and other silver-foliaged plants. As an added bonus, all the sedums are attractive to butterflies.
  • Autumn Asters
    Asters are another fall bloomer that butterflies love. These perennials like sun and moist, well-drained soil. There are many colorful aster varieties in shades of pink, purple, blue and white. Some favorites include tall-growing aster ‘Alma Potschke’ with bright pink flowers, blue-flowered aster ‘Professor Kippenburg’ and low-growing aster ‘Purple Dome’ with its deep purple blooms.
  • Autumn Goldenrod
    Sunny yellow goldenrod (Solidago) is another bright addition to the fall garden. Wrongly blamed as the cause of fall allergy problems, goldenrod has rightly taken its place in the fall garden. It looks particularly effective combined with blue flowering plumbago, purple asters and ornamental grasses.

Fall Bloomers for Shade Gardens

Even shade gardeners can enjoy late blooming perennials. Tall growing Japanese Anemones are a stately addition to the perennial garden. Bloom colors range from pure white to various shades of pink, and flowers can be single, semi-double or double blooms. Anemones grow well in light to moderate shade and spread quickly to form large clumps, filling in space vacated by spent summer plants. Turtlehead (Chelone) is another fast spreader for shade. Rose pink flowers cover the tops of the plant from early September to October. For a deeply shaded location, try Toad Lily (Tricyrtis), which has clusters of beautiful cream flowers, spotted with maroon along its upright stems. For light shade, plant Blue Cardinal Flower (Lobelia siphilitica), whose intense blue spikes can be admired from mid-August until frost.

No matter what type of garden you have, the end of summer does not need to mean the end of colorful blooms. Instead, just opt for amazing fall bloomers and enjoy brilliant color even longer!

Audition_3

Audition_2

Audition_1

Kale, the Super Food

Did you know kale is a super food? Kale belongs to the same family as cabbage, broccoli and Brussels sprouts. It is a rich source of vitamins C, A, & B6, and is loaded with manganese, calcium, copper and potassium, with no fat or cholesterol. Add it to your garden for a healthy harvest!

Planting

In the fall, set out transplants or sow kale seeds about 6-8 weeks before first frost in deep rich soil. Kale will need at least 6 hours of sun per day. Enrich your planting soil with plenty of compost. Planting kale in nutritious soil will promote faster plant growth and thus provide a tender, richer crop. Soil pH should be between 6.5 and 6.8. Sow seeds roughly one-half inch deep and thin seedlings to 8-12 inches apart to provide adequate air circulation. When thinning kale shoots, however, bear in mind that larger spacing will produce larger plants, larger plants produce larger leaves and larger leaves are generally tougher. Keep soil moist and mulch to control weeds. Water when planting and during dry spells.

Harvesting

Don’t worry about frost harming your harvest, a light frost will only enhance the sweetness of kale. Harvest the outer leaves of kale as they are needed for salads and recipes. Young tender leaves will grow from the center of the plant. Use the young leaves for salads and keep older leaves for cooking, which will help tenderize those larger leaves. Kale will continue to produce throughout fall in the warmer sections of our area. In low lying areas or where it is colder, use floating row covers or low tunnels to extend the life of your kale. Kale will bolt (elongate) and flower in the spring. This signifies the end, and it is time to pull it up and compost the remaining plant.

Cooking

Kale may be used fresh or frozen. It may be steamed or stir-fried, or used in soups, stews, omelets and casseroles. It is a tasty base for salads or can be added to sandwiches. It may be used in recipes as a replacement for spinach and collard greens. It even makes fantastic chips!

Kale Chips

  • Preheat oven to 425 degrees Fahrenheit.
  • Clean Kale and spin dry. Remove all the tough stems.
  • Drizzle about 8 cups of leaves with one tablespoon of olive oil and toss to coat.
  • Place Kale leaves in a single layer on a parchment lined cookie sheet.
  • Bake for 10-15 minutes or until leaves are crisp but not scorched.
  • Remove from oven and immediately sprinkle with generous amount of flaky sea salt.
  • Devour!

With so many tasty options for kale and so many nutritional benefits from this super food, there’s no excuse not to add this easy-to-grow dietary wonder to your garden!

kale_close_250x250

kale_250x250

Pruning Red Raspberries

There’s an unfounded rumor that raspberries are difficult to prune. This isn’t true if you understand the type of raspberry in your garden. Summer-bearing raspberries produce only one harvest per year while everbearing, or fall-bearing, raspberries can produce two harvests.

Raspberry Types

Summer-bearing raspberries plants bear fruit on one type of cane, a floricane. These large, thick canes grow fruiting lateral branches. Most of the purple and black raspberry varieties and some red varieties are summer-bearing plants.

Everbearing raspberries grow two types of fruiting canes, floricanes and primocanes. The floricanes are similar those of the summer-bearing raspberry. However, the primocane has no lateral branches. Instead, the fruit buds are located on the thick cane. Most red and yellow raspberry varieties are everbearing.

No matter what type of raspberry you grow, proper pruning improves production and the taste of the fruit, the appearance of your garden and makes it easier to harvest the delicious fruit.

Raspberry Pruning Tips

If you are growing summer-bearing raspberries, you will follow a cycle of pruning out the older floricanes, which already bore fruit. If you are growing ever-bearing raspberries, you will prune out floricanes and the top one-third of the primocanes where fruit developed in the fall. However, you can choose a second option for pruning everbearing raspberries. Simply cut the entire plant to the ground in early spring to produce berries from fall until the first frost. This sacrifices the summer harvest, but puts all plant energy into fruit production for fall harvest, creating a larger, more robust crop. It also protects the canes from any extreme winter conditions and reduces insect damage. Using row covers or greenhouses to maintain a warmer temperature easily extends the harvest season later into the fall.

To simplify the pruning process…

raspberry-chart

When you grow your own berries, you know exactly how they were grown, you save money, and best of all, they taste great, even with dirt under your fingernails!

raspberry-1

Simple Water Features for Small Spaces

A simple water feature can make a large impact even in small spaces. The addition of a container water garden will transform, beautify and diversify your existing garden into an oasis that brings relief during the dog days of summer and beyond. Sit back, relax and enjoy the melodious sound of dancing water from your garden pond, and it will provide soothing, background music to your summer retreat. Bring wildlife into the garden by incorporating fish, frogs and snails into your mini aquascape. A simple water feature may be placed in the garden, on a deck, patio or porch or even added to a rooftop garden for a tremendous impact in a tiny space.

Choosing a Container

Container water gardens can be created from practically anything that has the capability of holding water or supporting a liner. Ceramic sinks or tubs, half-barrels, buckets, pottery or planters and troughs can all be used to create beautiful ponds. Remember, these features will look their best when the shape and materials are similar in style to that of your home and surrounding gardens.

Lining Your Container

If you have chosen a whiskey barrel or other similar wood container, follow these simple instructions to incorporate a liner to waterproof the container.

  1. Center your flexible liner over the whiskey barrel or other container. Push down in the center so excess material is evenly spaced over the outside lip. Begin folding the liner over itself at 4 to 6 inch increments, working your way around the container and minimizing any bulges. Fasten each fold with a ½ inch staple placed about ½ inch from the top of the container.
  2. Trim the liner so it is even with the lip of the barrel or container.
  3. Fill your container with water, and then arrange your aquatic plants and pump/filter system.

Rigid pond liners are also available to insert into half whiskey barrels for ease of waterproofing these containers, but double check sizes to be sure you choose the right fit.

With such a wide assortment available, pots and planters make great garden ponds when properly prepared.

  1. Plug the drainage hole with a small piece of pond liner spread with caulk.
  2. Seal any minor cracks with caulk.
  3. Paint the inside of the container with a water garden sealant.

Properly lined, your container will hold water easily without slow leaks that can traumatize plants and destroy your water garden.

Picking Plants

The use of aquatic plants will help you avoid the need for algaecides by reducing pond algae in two ways. First, aquatic plants remove excess phosphorus and nitrogen from the water. Second, plants shade the water from sunlight, thereby inhibiting algae growth. For a healthy balance, cover half of your pond surface with floating plants for shading. Submerged plants should be planted at a rate of one bunch, 6-10 plants, for every 5 square feet of surface area. Marginal or bog plants will complete the ecological balancing act.

  • Floaters: Water Lettuce (Pistia stratiotes), Water Hyacinth (Eichhornia crassipes), Frogbit (Hydrocharis morsus-ranae) and Miniature Water Lilies (Nymphae spp.). These plants provide habitat and will shade the pond water surface to reduce the production of algae.
  • Submerged Oxygenators: Anacharis (Elodea Canadensis), Water Buttercup (Ranunculus aquatilis) and Fanwort (Cambomba caroliniana) are great choices that help maintain water clarity by consuming excess nutrients that contribute to the production of algae. These plants can reproduce rapidly, but they are easily controlled in the small pond by simply removing surplus growth.
  • Marginal Plants: Sweet Flag (Acorus spp.), Dwarf Cattail (Typha minima), Dwarf Papyrus (Cyperus profiler), Iris (Iris pseudacorus) and Camelion plant (Houttuynia cordata). Placed at a pond’s edge, these marginal aquatic plants add color, height and variation to the water garden. They also provide cover, habitat and oxygen.

Be careful not overwhelm your container water garden with too many plants or it will be difficult to maintain a natural balance.

Fish and Other Pond Life

Different types of wildlife will love to be a part of even a small water garden.

  • Fish: Fish create additional interest to a water garden by adding sparkle and movement. Good choices for a small water garden are: Goldfish, Red Comets, Calico Fantails and Shubunkins. Do not overstock your water feature. As a rule of thumb, each inch of fish should have 6 square inches to one square foot of water.
  • Snails: Slow and steady, snails can help keep your water garden clean and healthy. Japanese Trapdoor Snails eat algae stuck to the sides of the pond and will consume excess fish food.
  • Tadpoles and Frogs: Tadpoles will morph into amusing frogs. Tadpoles eat algae and add motion and interest to the pond, especially for children. Frogs will lend sound to the garden and aid in insect control.

Water Garden Container Care

Several common problems can occur even in small water gardens, but they are easily controlled and you can keep your water garden looking beautiful.

  • Algae: Despite all your planning, it is perfectly natural for your pond to turn green at first. Once the plants get to work, the green will fade. If you find that you require a little extra help in algae control, try Microbe-Lift or Barley Straw pellets, both are natural algae controls. Adding an extra snail or other algae-eater to the pond can also help control the color naturally.
  • Mosquitoes: Mosquitoes may be managed in several ways. Adding water movement to the pond with a pump and small fountain will keep the insects from breeding or settling on the water. Adding BT (Bacillus thuringiensis) to the water in the form of Mosquito Dunks will also discourage the insects. Incorporate small fish into your pond garden, they eat mosquito larvae. Other mosquito predators include: dragonflies, bats, tadpoles and frogs, all of which can be a part of your backyard ecosystem.

Maintenance

Check the pond weekly. You need to be observant to animal activity and any abnormal growths or marks. Inspect plants and fish for health, insects or disease. Clean up any dead or yellowing foliage. Replace evaporated water as necessary. If your water contains chlorine or other chemicals, be sure they are removed before adding this water to your pond. Chlorine is toxic to fish and beneficial bacteria. Chlorine will dissipate after a few days if it is exposed to air, but do not add fish or plants until after this is accomplished.

With just a little thoughtful planning, the right plants and proper care, you can have a small water garden to brighten up a small space in your yard.

WaterFeature_3WaterFeature_4

WaterFeature_1

WaterFeature_2

Grasses With Gusto

Ornamental Grasses lend a unique dimension to any landscape with their texture, sound, motion and architecture. By planting ornamental grasses, you can also add multi-seasonal excitement to your landscape. Either combined with other ornamental plants or featured by themselves in “Grass Gardens,” ornamental grasses are attractive from spring until late fall and often through winter as well.

Choosing Ornamental Grasses

It can be challenging to select the best ornamental grasses for your landscape. Choose from varieties that are short or tall, upright or weeping. Foliage can be bold or fine and comes in colors ranging from green, blue-green, lime-green, gold and red to variegated with horizontal or vertical bands of white or yellow. Flower heads can be showy plumes, fuzzy foxtails or airy particles and appear from mid-summer to fall, depending on variety. Dried flowers and leaves may persist into winter, looking particularly effective against a snowy backdrop.

Depending on the conditions of your landscape and your grass preferences, there are many different types of grasses to try.

Screens Or Barriers

Taller growing varieties such as Plume Grass (Erianthus ravennae) or Giant Miscanthus (Miscanthus floridulus) can be used as effective screens or windbreaks. The wind rushing through their foliage creates added sensations of sound and movement. Even some of the medium-sized growers, such as varieties of Miscanthus sinensis, can enclose a patio or act as a barrier against wind, noise or an undesirable view.

Specimens

Many ornamental grasses also make excellent specimen plants and can turn a dull corner into a focal point of color and texture. Some of the most dramatic grasses for specimen planting include Maiden Grass (Miscanthus sinensis gracillimus) with its graceful arching vase shaped foliage and pinkish blooms which age to cream, and Porcupine Grass (Miscanthus sinensis ‘Strictus’) that has upright green and yellow banded stems.

Waterscaping

Water gardens and ornamental grasses go together beautifully. A grouping of grasses looks particularly effective at the water’s edge, softening the boundary between land and water. Many grasses such as Miscanthus can tolerate moist conditions, some, like sweet flag (Acorus) and Giant Reed (Arundo donax), can grow in shallow water. Sedges (Carex), which are not true grasses, although similar in appearance, are also moisture-tolerant. Look for varieties with plain, variegated or golden foliage.

Groundcovers

Grasses that are groundcover varieties spread by underground stolons rather than forming tight clumps. One such selection is Ribbon Grass (Phalaris arundinacea ‘Picta’), a fast-spreading green-and-white variegated variety, particularly useful as a groundcover in difficult areas such as slopes or even under trees that cast light shade. Give this one plenty of space! You’ll also want to try green or variegated Liriope and Black Mondo Grass (Ophiopogon).

Beds and Borders

Massed in groups, ornamental grasses are wonderful as a background to, or in combination with, other plantings. Try planting them with perennials such as Black-eyed Susan, Sedum ‘Autumn Joy’ and Veronica ‘Goodness Grows’ or ‘Sunny Border Blue’ for a dynamic summer and fall interest addition to your landscape. Varieties for mass planting include Switch Grass (Panicum virgatum), whose upright delicate flowers are held above leaves that turn reddish in the fall; Korean Feather Reed Grass (Calamagrostis acutifolia ‘Stricta’) which yields stunning buff-colored plumes over a long period and Fountain Grass (Pennisetum alopecuroides) that sports maroon foxtails which age to cream in late fall. A number of different forms of Fountain Grass are available: ‘Hameln’ is a dwarf variety with creamy foxtails, while ‘Moudry’ has unusual black flowers. For edging beds and borders, plant low-growing Blue Fescue (Festuca glauca). Its steely blue clumps hold their color though winter and contrast well with pink or purple flowers or foliage.

Growing Grasses

Ornamental grasses are relatively easy to grow. A site that receives at least six hours of sun per day is best, although varieties such as Hair Grass (Deschampsia) and variegated Miscanthus (Miscanthus sinensis ‘Variegatus’) can grow well in as little as four hours of sun. Soil preparation, as with everything you plant, is a must, so work in plenty of organic matter such as peat moss, humus or compost. Fertilize in early spring with 5-10-5 or bone meal, when new growth is starting to show. Clumps should be cut back to within 6″ of the ground at this time, and can be divided if needed.

You’ll love the look ornamental grasses can give your landscape, and these easy-care plants can be effective at many functions in many different types of landscapes. Give them a try today!

Grasses_3Grasses_4

Grasses_1

green leaves of sedge cane

Growing and Storing Herbs

Growing herbs, whether inside or out, may be one of gardening’s most gratifying experiences. Because of their beauty and versatility, herbs may be grown amid vegetables, ornamentals or in a garden dedicated strictly to their kind. They may be nurtured in a sunny window box, strawberry pot, whiskey barrel or just about any container you choose. Situate your herbs for easy access: on the patio, deck, a sunny windowsill or in the kitchen garden. Herbs are relatively carefree and have a multitude of uses that include but are not limited to: culinary, aromatic, ornamental, medicinal and insect control.

Herb Growing Tips

Choose a full sun location, 4-6 hours per day is best. Herbs will grow in a shadier location, but plants will be weak and thin. Most herbs are not demanding of soil fertility. One thing that they will not tolerate, however, is wet or poorly drained soil, so be sure not to overwater your herbs.

Locate herbs in or near the kitchen for easy access when cooking. Be aware of the ultimate size, height and spread of the herbs that you plan to grow. If you take this into consideration you can assure room for the plants to reach their full potential. Position taller herbs to the back of the garden or container and shorter herbs to the front; this will allow for easier access and prevent shading.

Water pots before planting. Remove plants from their pots and loosen roots to stimulate new root growth. Place plants at the same soil depth that they were in the pot, or slightly higher to avoid rotting. Gently firm soil around each plant, water carefully and mulch if desired. Feed monthly with a mild, organic fertilizer such as Neptune’s Harvest Fish & Seaweed Fertilizer 3-2-1.

Some herbs, such as mints, have a tendency to be invasive and may take over an entire herb garden or even spread into the lawn or other parts of the landscaping. Sink aggressive potted herbs directly into the garden to minimize this overgrowth. Pull up pots each spring to replenish their soil, then sink the containers back into the garden for another season.

Growing herbs indoors is also quite simple. Choose herbs that will not get too large to handle inside. The same soil requirements apply for both indoor and outdoor planting. Select a south or west window to situate your plants so they receive adequate sunlight. It may be beneficial or necessary to supplement with artificial lighting during the winter months. Provide humidity by grouping plants together and misting daily. Another option is placing potted herbs on a humidity tray. Fertilize monthly with Neptune’s Harvest to provide the best nutrition.

Harvesting

Fresh herb leaves are ready to be harvested as soon as there is enough foliage to maintain the plant. Try to harvest in the morning, after the dew has dried but before the sun becomes too hot, using a sharp knife or scissors to make each cut. It is a good idea to harvest only what you plan to use at time of cutting, as herbs do not store well in the refrigerator. With most herbs it is beneficial to harvest before the plants go to flower, as the taste is better at this stage of growth. Rinse with cold water and pat dry before using.

Drying

If you have excess herbs, you may want to dry them for future use. After gently rinsing the harvested herbs, drain them on absorbent towels, tie in bunches and dry thoroughly by hanging bunches up in the sun just until all water evaporates from the surface of the herbs. Remove plants from sun and hang in a clean, dark, dry location with good air circulation for 1-2 weeks until herbs are completely dry and brittle. If not dried completely the herbs will become moldy in storage. Remove leaves from the stem and store them in an airtight container in a cool, dry, low light environment. Check container in a few days for condensation. If there is any moisture in the container you must start the drying process again, after checking carefully for any mold or mildew.

You can also dry herbs in a conventional or microwave oven. With a conventional oven, position clean herbs in a single layer on a shallow pan. Place baking pan in a 180°F oven for 2 to 4 hours. When using a microwave, place clean herbs in a single layer on a paper towel or plate. Cook herbs on high for 1 to 3 minutes, rotating the plate every 30 seconds or moving the leaves around on the plate until thoroughly dry. Store these herbs just as you would air-dried herbs.

Freezing

Freezing herbs is also easy to accomplish. Wash herbs and blanch them in boiling water for one minute. Cool herbs very quickly in ice water then drain. Package herbs in airtight plastic bags and store in the freezer.

Herbs can be delightfully easy to grow and they are an even more delightful addition to salads, sauces, pastas, teas and many other treats you can enjoy year-round.

Herbs_1Herbs_3

Herbs_2