Monthly Archives: February 2017

Jump Start Your Pond

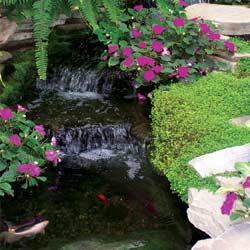
Are you ready to get your pond started up for another beautiful spring and summer? It can be a big job to rejuvenate such a large water feature so it remains balanced and healthy after a long, harsh winter, but with a few careful steps, your pond can be back in shape in no time.

When to Reopen Your Pond

It is important that you don’t try to get your pond started too early in the season. All risk of hard freezes should be long past, and even nightly frosts should be tapering off or already finished before you restart your pond. The exact time will vary based on your pond’s size, depth and location, as well as your ambient weather conditions and the pond’s overall ecology. For example, a smaller, shallower pond in a sunny area will be warmed up and ready to restart before a larger, deeper pond in a shady spot. It can be helpful to keep a journal or calendar from year to year to note when you reopened your pond and how successful your efforts were. In time, you’ll be able to adjust your calendar easily without risking the health and wellness of your pond, even if annual conditions change.

Easy Steps to Restart Your Pond

When you are ready to jump start your pond…

  • Remove the netting that was set in place last fall. If needed, clean and make repairs to the netting right away so it will be ready to use next fall. Store it safely where it will be easy to reach when needed again.
  • Remove excess sediment from the bottom of the pond with a vacuum or a net. It is not necessary to remove every bit of sediment, but most of the debris should be removed so the pump can function effectively.
  • Test last year’s pump and replace if necessary. Be sure to test any additional moving or electrical features, such as waterfalls, fountains or lighting around the pond so repairs can be made if needed.
  • If water level is low, add fresh water to desired height. Avoid overfilling the pond, however, which can disrupt the essential chemical and microbial balance that keeps the pond healthy.
  • Add de-chlorinator as necessary to remove heavy chemicals from the water that has been freshly added to the pond. As with any chemical treatments, be sure to test the water several times to be sure you reach the proper balance.
  • Place aquatic plants in the pond and begin fertilizing to meet their nutritional needs. These may be plants that you’ve overwintered in a safe location, or you may choose to add new or exotic plants in late spring.
  • Begin feeding fish when water temperature stays above 55 degrees. Keep feedings minimal at first as fish come out of dormancy, as excess food will only rot and lead to greater bacteria and algae growth in the water.

It is perfectly natural for your pond water to turn green at first, but with the proper plants it should balance itself out in no time. It may take a few days or even a couple of weeks for your pond to return to its healthy, active state, but if you’re restarted it properly, you shouldn’t have any major problems.

pond

Green Gardening

Planting a vegetable or flower garden seems like the perfect thing to do when you are looking for ways to adopt a greener, more environmentally-friendly lifestyle. Some traditional gardening practices, however, may not be quite as “green” as you might think. Planning your gardens with the environment in mind and choosing some practices that maintain healthy ecosystems can help you create a truly “green” garden. 

Tips for a Green Garden 

There are easy, effective steps you can take in your garden to go green, including… 

  • Plant local and native species of trees and shrubs which are naturally adapted to the conditions in your area, thus requiring less watering and having natural defenses for local insect pests and plant diseases.
  • Collect rainwater for watering your container gardens and new transplants, and adjust your irrigation schedule to compensate for whenever Mother Nature does the watering for you.
  • Use organic compost and mulch to improve soil health and reduce the need for pesticides and fertilizers. Better yet, make your own compost so you can adjust it to exactly what your plants need while keeping more waste out of landfills.
  • Opt for disease-resistant and pest-resistant plants rather than trying to force plants into an unfriendly area where they will need chemical assistance and extra maintenance to thrive.
  • Try to use natural products instead of chemical fertilizers and pesticides. Use traps, parasites and natural predators such as ladybugs and lacewings. Plants that repel insects – basil, chives, mint, marigolds or mums – mixed in with other plants can help keep pests away.
  • Choose wildlife-friendly plants such as flowerbeds that will attract hummingbirds, butterflies, bees and other pollinators, and don’t be upset to share some of your garden space with other critters.

These are just a few of the simple changes you can make in your gardening practices that will benefit the environment.

Green Products 

More and more “green” products are readily available to help you maintain the natural health of your garden. Before using a product, however, be sure it is suitable for your situation, and follow all application and use instructions. Even organic or eco-friendly products can become toxic contaminants if they are improperly used.

Popular options for green gardening products include… 

  • Dr. Earth contains probiotic beneficial soil microbes, plus ecto- and endo- mycorrhizae which feed the fiber of the living soil by releasing natural organic matter. People and pet safe.
  • Dr. Earth pest controls are organic controls for all of your pest problems, including all types of unwanted or troublesome insects. People and pet safe.
  • Espoma Organic Traditions line of products includes bone meal, kelp meal, garden sulphur, potash and garden lime for helping to improve your soil without artificial chemical compounds.
  • Bonide offers organic fertilizers as well as organic formulas for pest and plant disease control, such as fruit tree sprays.
  • Scotts Organic Choice lawn care products provide more environmentally friendly choices for your yard.

Developing “green” gardening practices benefits you and your family, your garden, your native plants and animals, your water supply – our world, all of us.

SONY DSC

Tomatoes and Peppers – A Gardening Tradition

Tomatoes and peppers are two crops you can never have too much of. They freeze well without the difficulty of blanching, and although the texture of tomatoes disintegrates, the flavor remains good. Both tomatoes and peppers offer brilliantly colored fruit that can be particularly attractive in the garden or in containers. Both have the same requirements – a sunny, nutrient-rich site that is well-drained. To prevent disease problems, neither should be planted in a location where tomatoes, peppers or eggplants were grown the previous year. If you’re not growing both tomatoes and peppers, you’re missing out!

Tomatoes

Tomatoes come in two different types: determinate and indeterminate. Determinate, or bush varieties, grow 1-3’ tall. When flowers form at the vine tips, the plant stops growing. This means fruit sets all at once – which makes them excellent for canning. Indeterminate types, on the other hand, have sprawling vines that grow 6-20’ long, and keep producing and growing until frost. Indeterminate vines should be pruned to ensure that they do not put too much energy into vine production. Pinch out sideshoots (“suckers”) as they develop to prevent excess growth and encourage more fruit.

Tomato plants should be set deep in the soil with the first leaf just above ground level. Leggy plants can even be planted horizontally as roots will develop from the planted stem.

Blossom-end rot can be a common problem with tomatoes. It is a leathery scar that develops on the bottom of the fruit. This is caused from a deficiency of calcium and/or irregular watering. To ensure a supply of calcium, work BumperCrop soil amendment into the soil before planting and maintain regular watering. Feed tomatoes once a month with BumperCrop Vegetable food. Apply mulch around all vegetable plants to help keep the soil moist and cool.

Another disease, early blight, makes dark, depressed areas on the leaves just as first fruit appears. Late blight appears as black, irregular, water-soaked blotches on leaves and dark-colored spots on fruits. Both diseases usually occur during cool, rainy weather. Destroy plants to keep from infecting other plants and select resistant varieties to minimize future outbreaks.

Spread by aphids, tobacco mosaic virus will appear as yellow, mottled foliage with fruit possibly being stunted. Severely affected plants should be destroyed. Aphids should be controlled to prevent infection.

Peppers

Ranging in selections from crispy sweet to fiery hot and from big and blocky to long and skinny, peppers should be cut from the plant rather than pulled off. Most sweet peppers become even sweeter when they mature as they turn from green to bright red, yellow, orange or even brown or purple. As hot peppers mature and turn red, they get hotter.

Peppers are also susceptible to blossom end rot and tobacco mosaic virus the same as tomatoes. The same measures should be taken to prevent infection.

Although we’ve touched on the most common problems with tomatoes and peppers – if you’re not sure, bring in a sample to let one of our experts correctly diagnose the problem and help you find a solution.

Types of Tomatoes & Peppers -below are a few we may carry visit our product page for a an updated list. 

Tomatoes

  • Beefsteak – Large slicer
  • Better Boy (VFN) – Medium
  • Big Beef – Large slicer
  • Big Girl (VF) – Medium
  • Celebrity (VFNTA) – Medium
  • Champion (VFNT) – Large
  • Early Girl (VF)- Medium, early
  • Husky Gold (VF) – Medium yellow
  • Husky Red (VF) – Medium
  • Lemon Boy (VFN) – Yellow
  • Patio – Self-supporting, medium
  • Roma (VF) – Medium
  • Sunray – Yellow
  • Supersonic – Medium to large
  • Supersteak – Large slicer
  • Sweet 100 – Cherry

Notations after the tomato variety designate their resistance to the following diseases: V-Verticillium, F-Fusarium, N-Nematodes, T-Tobacco Mosaic, A-Alternaria

Peppers

  • Biscayne Italian Fryer – Sweet
  • California Wonder – Sweet
  • Cherry Hot – Hot
  • Cubanelle – Sweet
  • Golden Bell – Sweet
  • Habanaro – Hot
  • Hungarian Wax – Hot
  • Italian Gourmet Fryer – Sweet
  • Ivory Bell – Sweet
  • Jalapeno – Hot
  • Jupiter Green – Sweet
  • Lady Bell – Sweet
  • Lilac Bell – Sweet
  • Long Hot Cayenne – Hot
  • Mandarin (Orange Bell) – Sweet
  • Sweet Banana – Sweet

In The Kitchen

There are hundreds of delicious recipes to try with either tomatoes, peppers or both at once, whether they are fresh or canned. Try this favorite tomato recipe, and use your strong crops of both of these fruits to experiment with different flavors and tastes all year long!

Scalloped Fresh Tomatoes

  • 1 medium onion, chopped
  • 2 Tbsp butter or margarine
  • 4 medium, ripe tomatoes, sliced
  • 1 cup grated sharp cheese
  • 1 cup fine, soft bread crumbs
  • 1 cup dairy sour cream
  • 2 eggs, well-beaten
  • ½ tsp salt

Cook onions in butter until tender. Place half the tomatoes in a 10 x 6 x 11 ½” baking dish. Top with half each onions, cheese and crumbs; repeat. Mix remaining ingredients. Pour over top. Bake at 350 degrees for 35-40 minutes. Serves 4-5.

tomato-pepper-2OLYMPUS DIGITAL CAMERA

Planting Basics – Trees & Shrubs

Are you ready to add trees and shrubs to your landscape? You don’t need to hire professionals to do the planting when you learn the basics of doing it the right way yourself.

Soil Preparation

How quickly and how well trees become established once they are planted is affected by the amount of stress they are exposed to before and during planting. Minimizing planting stress is the goal of proper planting. Trees and shrubs should also be thoroughly watered prior to planting to minimize water stress.

Ideally, soil preparation should be carried out well ahead of planting. Preparation could include incorporating organic matter into the soil to improve aeration, assist drainage of compacted soils and improve soil nutrient-holding capacity. Specific preparation may be needed if the soil has an inappropriate pH or is lacking in certain elements. Trees and shrubs with a limited soil tolerance range may require very specific soil preparation to meet their requirements.

Additional soil preparation is essential when you are ready to plant trees and shrubs. Dig the planting hole 50 percent wider but only as deep as the root ball. Prepare soil by mixing one-third existing soil, one-third organic matter and one-third topsoil.

Planting Container-Grown Trees & Shrubs

When you buy a plant from a garden center or nursery, it often comes in a small pot that holds the roots. Remove the plant from that container gently, but without pulling on delicate stems or foliage. Squeezing the container all around can help loosen the root ball so it slides out more easily, or the container may be thin enough to cut away.

Because the plant was grown in a container, its roots have been restricted by the shape of the container. Loosen the roots all the way around, even on the bottom. If the root system is too tight to loosen with your fingers, cut through roots slightly with a knife or pruning sheers. Make three or four one-inch deep cuts, then gently pull the roots apart.

Center the plant in the prepared hole, keeping it 1-3 inches above grade. Keep roots spread out.

Planting Field-Grown Trees & Shrubs

If you are transplanting a tree or shrub that has been field grown, it may have bare roots or be lightly bagged or burlapped. Center the plant in the prepared hole 1-3 inches above the grade. Cut and remove all cords or twine from the root ball and trunk. Burlap should be left on, but loosened and pulled away from the trunk and below the soil surface. Remember to move trees carefully. Roll the root ball on its side and “steer” it into the hole with the trunk. Straighten the tree upright in the hole, checking it from different angles to be sure it is fully upright.

Completing the Planting

For both container-grown and balled and burlapped plant material, backfill the planting hole with soil your mix and pack firmly. Make a rim of soil around the plant to act as a “saucer” for holding water.

Water thoroughly with a slow soaking, and use a root stimulator fertilizer to provide good initial stimulus for the roots to spread out.

Apply a 2-inch layer of mulch around your new planting, keeping an open space of 3 inches around the trunk or base of the plant to allow for air circulation.

Staking Container & Field Grown Trees and Shrubs

When larger trees or shrubs are planted, they are not yet firmly established in their new locations and may tip or lean as the soil settles. For larger trees, use three wires secured to anchor stakes in firm ground (never into the root ball). Where the wires touch the tree, they should be covered with rubber hose to prevent damage. Remove stakes as soon as roots become established. This can be as soon as a few months, so check your tree frequently. Stakes should not be left in place any longer than one growing season.

New Plant Care

All newly planted trees and shrubs need gentle care as they settle in to their new locations. To keep them healthy and encourage good initial growth…

  • Water Properly
    Plants should be slowly soaked to a depth of 4 inches, which is the equivalent of about an inch of water per week. This is necessary during the first year or two. Let the hose run slowly at the base of the plant until the water has penetrated to the root depth. Too much water can also be a problem. Feel the soil. If it is soggy or squishy, do not add water. Frequent light watering is not as good as a thorough soaking once per week, which will encourage strong root growth.
  • Fertilize Appropriately
    Your new plants should be given a Root Stimulator type fertilizer right after planting. You should not use a fertilizer meant for mature plants on new material, as it could cause damage to your plant. It is essential for new plants to develop a healthy root system – top growth will follow. After the first season, regular fertilizers can be used.
  • Prune Safely
    Pruning at planting time may be necessary for larger trees to reduce leaf surface to match cut roots. Remove one-third of smaller twigs. Do not cut back the main trunk or larger branches. If shaping is necessary, trim side branches enough to get uniformity.
  • Be Alert for Insects and Diseases
    Keep an eye out for holes or brown leaves or needles. This could be a sign of insect or disease problems. Ask our staff for help identifying the insect or disease and to prescribe appropriate treatments.
  • Special Care Plants
    Some plants need extra special care because of their finicky needs. For example, azaleas, hollies, rhododendrons and dogwoods all need well-drained, acidic soils, high in organic matter and a shady location. Research the trees and shrubs you are planting to be sure you are meeting their needs right from the beginning.

It can seem intimidating to plant your own trees and shrubs, since they are an investment in your landscape that you hope to enjoy for many years. By understanding planting basics, however, you can easily give every plant a great start in its new home.

Time to PlantTime to Plant

Time to Plant

Time to Plant

Try Something New: Pomegranates

Want to grow an exotic fruit that is delicious, nutritious, beautiful and incredibly hip? You really should consider planting a pomegranate! It’s not as difficult as you may think.

Why Pomegranates are Popular

Pomegranate is a stunning superfood rich in antioxidants, folic acid and vitamins A, C and E. It has no cholesterol, and is also rich in fiber and potassium. Because of these nutritional advantages, pomegranate is showing up in a multitude of supermarket products like yogurts, juices, salad dressings, jellies and desserts. It can be added to sauces, fruit crisps, salsas, relishes, dips and more. You can even make a pomegranate martini! And, of course, it’s an extraordinary experience eating a fresh pomegranate. These are stunning, delicious fruits that are rarely seen in backyard gardens, but can make a great landscaping statement when properly grown.

Growing Pomegranates in the Landscape

Pomegranates grow as multi-stemmed, small trees or large shrubs. They reach 15 feet tall by up to 15 feet wide. In spring, vibrant, gorgeous orange-red flowers grace the branches of this plant. These beautiful blossoms develop into the luscious pomegranate fruit containing dozens of tart and tangy bright red seeds and pulp. The fruit ripens somewhat square in the early fall and has a leathery skin that can be yellow to red in color.

The cultivar ‘Wonderful’ is hardy to zone 7 and is easy to grow. Plant your tree in full sun. It will thrive in the summer heat and in most soils. Pomegranates are drought tolerant, however, the fruit is better and the seeds more plump with regular deep irrigation. Because this fruit tree is self-fertile, there is no need to plant a second one for pollination.

Enjoying Your Pomegranates

If you’ve never cut your own pomegranate, it can be frustrating to learn how to separate the juicy seeds from the husk and membrane. To access the seeds…

  1. Cut off the crown of the fruit.
  2. Score the leathery husk in quarters from stem to crown end.
  3. Set the scored fruit in a bowl of cool water and let soak for a few minutes.
  4. Hold the fruit under water and break scored sections apart with your fingers, separating the seeds from membrane. The seeds will sink to the bottom of the bowl.
  5. Discard the skin and membrane.
  6. Drain the seeds on paper towels.
  7. Toss pomegranate seeds into your salad, mix them in your yogurt or smoothie or shake them into a martini and enjoy!
pomegranate-1pomegranate-2pomegranate-3

Edging and Trimming

Edging and trimming the lawn is like having a manicure after cutting your fingernails. It smooths out any roughness and adds an elegant finishing touch to your landscape, and everything is just more perfect! But which lawn care activity is which, and how do you do them properly to give your lawn that manicured look?

Edging or Trimming – Which is Which?

Before you pull out the lawn tools, it’s important to know which activity you need to do to create the look you want.

  • Edging
    When you are edging, you define the line between a hard surface (sidewalks, driveways and curbing) and a growing area such as a flower bed, garden or lawn. To achieve this, a vertical cut is made between the two using a spade or edging tool. Some have mastered the art of using the string trimmer to do this. This creates a crease-like separation between the organic (growing) and inorganic (non-growing) surfaces. Properly done, edging will help minimize weed growth in these cracks and crevices and gives the landscaping a smooth, formal appearance.
  • Trimming
    Trimming removes the grass, weeds and other plants from areas a lawnmower can’t reach. Long wisps of grass along the side of the house, fence or other structure aren’t very attractive, and trimming them away will give a finished, uniform look to the landscaping. Most people use a string-trimmer or bladed trimmer for this work, but hand shears also do the job. Trimming is also often done around trees or in tight corners where a lawnmower is less effective.

When to Do Edging and Trimming

How often should trimming and edging be done? This depends upon your own personality. Some people feel edging and trimming is a requirement of every mowing. Others do edging and trimming every third or fourth time they mow, or whenever it may look necessary to give the lawn and landscape a uniform look.

Edging and Trimming Tips

No matter how often you choose to do edging and trimming, it is important to do it effectively!

  • Use only the proper tools for these landscaping tasks. This will help prevent injuries or strain on your hands, wrists and elbows, and will get the job done more quickly and efficiently.
  • Check edgers and trimmers regularly to be sure they are sharp, well-oiled and in good functioning condition. Keep extra string for a trimmer on hand so you can quickly replace the spool when it runs out.
  • Always practice good safety measures when edging and trimming. Wear safety goggles if there is risk of flying debris (as there often is), and keep the tools away from children and pets.

For many people, edging and trimming is all part of good lawn maintenance. Once you know the differences between them and how to do them well, you’ll be amazed at the difference these tasks make to the beauty of your lawn.

Crape Myrtles

No yard or landscape should be without a crape myrtle, or two, or three or… many! How wonderful to have something that blooms so profusely during that time of year when most other plants are looking tired and worn from the summer heat and drought. The versatility of this plant makes it suitable for many types of yards and many uses, and once established, they will go on to add charm and delight to the landscape for many years.

About Crape Myrtles

Crape myrtles bloom in late summer and can be found in flower colors of pinks, lilac, white, reds and purples. Requiring very little maintenance once established, crape myrtles need a full sun location to thrive and they do not like wet feet. Keep these needs in mind when selecting a site to plant them. They will require some supplemental watering for the first year or so to get off to a good start and develop good roots. Crape myrtles are also pretty much pest-free, except for aphids on occasion and these are easily controlled with an insecticidal soap spray. Some varieties are more susceptible to powdery mildew than others but most of the newer varieties are more resistant to this fungus problem.

Planting Crape Myrtles

Although tolerant of a wide range of soil qualities, crape myrtles grow poorly in wet locations so be sure to select a well-drained planting site. Late spring to early summer is the best time to select and plant your new crape myrtles while they are actively growing and can settle in quickly. Plant at or slightly above ground level, spreading the roots out slightly and using mulch to protect and shelter the roots after planting. They do prefer a slightly acid soil.

Crape Myrtle Types

Crape myrtles can be found in shrub, multi-stem tree and single trunk tree forms. For best results select a cultivar whose growth characteristics and ultimate mature size fit your intended use. Planting a shrub- or tree-like crape myrtle in an area of limited space will require yearly pruning to keep it from outgrowing its place. Single- or multi-stemmed tree-form crape myrtles are ideal as flowering specimen trees or as small, flowering shade trees near patios, walkways and entrances. Shrub forms make an excellent accent in a shrub border when planted in groups. Dwarf plants are effective as large groundcovers, perennial bedding plants or container plants providing vivid, summer-flowering interest.

Pruning Crape Myrtles

If adequate room is provided, little pruning is required except to maintain shape or remove any dead or crossing branches. Remove any suckers or water sprouts to maintain tree forms and elegance. Blossoms are produced on new growth so you can prune anytime the plants are dormant through the winter.

With so much to love about these plants, there’s no reason not to add one to your yard this year! And next year, and the year after that, and the year after that…

Save

Summer Sizzles With Crocosmia

There is an excellent assortment of bulbs available for planting this time of year that promise a bounty of summer blooms. The thing is, many of these bulbs are not winter hardy. This can create a predicament for gardeners anxious for easy summer flowers but short on time and space to dig and store tender bulbs. Crocosmia can be the answer.

Introducing Crocosmia

Native to South Africa, Crocosmia – also known as montbretia, coppertips or falling stars – sizzles all summer long in colors of yellow, orange and red. The numerous small florets are tubular in shape and borne along a long, gracefully arching stem rising above sword-like foliage. Together, this formidable combination creates exotic elegance sure to be a showstopper in the garden or landscape. Hummingbirds and butterflies also find it irresistible when in bloom, and the fall seedpods are delectable for many seed-loving finches and sparrows.

Planting Crocosmia

Plant Crocosmia corms now, while they are available. Plant them in well-drained soil in full sun, 2-3 inches deep and 8-10 inches apart. A south-facing location is best, or in colder regions, add Crocosmia next to a wall that will help warm the soil. The pointy side of the bulb should be facing up. Place a handful of bone meal in the planting hole and water the soil well when done planting. These are drought-tolerant flowers, but supplemental water will still be welcome in extremely dry conditions.

Crocosmia look best when planted en masse. A grouping on either side of a sunny entrance way can be stunning, and they look equally fetching when tucked into the perennial border. This plant performs well in containers and makes an excellent cut flower – in fact, cutting the flowers will encourage even more beautiful blooms to form.

Blooms will first appear in May or June and will continue blooming throughout the summer. Flower spikes can stretch 2-3 feet tall, adding a bold burst of color to the landscape. Even without the flowers, the blade-like foliage is attractive, and some cultivars show pleats or rippling for more textural interest.

After flowers have finished blooming, simply snip off the faded flower stalks. Leave the foliage to fade naturally as you would with any other bulb. These leaves continue to produce food to provide nourishment for next year’s flowers. Leaves may be cut back to the ground once they are completely yellow, and a thick layer of mulch should be added for winter protection. Once established, these bulbs are winter-hardy and will return year after year to heat up the spring and summer with their gorgeous colors and forms.

Crocosmia

Begonias for the Home

Begonias are a beautiful and diverse group of plants, with more than 1,500 species. Some are suitable for use as bedding plants or in container gardens, some for hanging baskets and others for indoor cultivation. Begonias are treasured not only for their colorful flowers but also for their unique foliage, and many varieties make spectacular houseplants. 

Indoor Begonia Care 

Begonias require little care when grown indoors. They need plenty of bright light with shading from the intense afternoon sun. Comfortable indoor temperatures are advisable, 65-75 degrees Fahrenheit, and should drop slightly at night, but not below 55 degrees Fahrenheit. Begonias are very sensitive to over watering. Make certain that the soil drains well, the pot has a drainage hole and water is not permitted to stand in the saucer. It is beneficial to provide additional humidity as heating and air conditioning rob indoor air of precious moisture. The best way to increase humidity is to use a humidity tray under your begonias. Avoid misting these plants to prevent mildew on leaves. Provide adequate air circulation to ensure the foliage stays fresh without excessive dampness. 

Indoor begonias are relatively carefree if they are kept healthy. Insects that commonly affect indoor plants may also cause problems for begonias. These include mealybug, whitefly and spider mites. If leaves become crispy around the edges it is an indication that the plant requires more humidity. If the leaves yellow and start to fall off it means the plant is receiving too much water. Fertilize begonias bi-weekly with a balanced fertilizer during the growing season. Stop fertilizing during the winter months to give the plant a rest.

 If you have any questions about these or any other houseplant problems, please call or stop by our greenhouse and speak with one of our experts. 

Best Begonias for Indoor Cultivation 

  • Angel Wing Begonias
    These begonias are favored for their large, colorful, patterned, wing-shaped leaves. The flowers of this begonia are large, hang in clusters and tend to be soft in color. Angel Wings bloom in shades of white, pink, red and orange. Due to their cascading habit, these plants lend themselves well to hanging baskets but also look wonderful in larger pots. You may pinch Angel Wing Begonias to keep them at a manageable size and also to promote new canes at the base of the plant. Hang these plants outside in a semi-shaded area during the summer.
  • Rex Begonias
    Although these begonias do flower, rex begonias are grown primarily for their striking foliage. The leaves are uniquely shaped, unusually patterned, heavily textured and come in exceptional color combinations that can include green, pink, red, silver, yellow, orange, maroon and purple.
  • Rieger Begonias
    These are one of the most loved and easy to care for houseplants. The main attraction of this plant is the brilliantly colored, double or semi-double flowers in white, yellow, orange, pink and red. This plant will flower for several months and the flowers will last longer if temperatures are on the cooler side, 55-65 degrees Fahrenheit. Deadhead to encourage new blooms and extend the blooming season.
begonia-2

Rex Begonia

begonia-3

Ornamental Grasses

Ornamental grasses can reduce your watering costs, lessen your mowing time and increase the interest level of your garden. No matter what your garden’s needs, there’s a grass to solve it. From short ground covers to tall bamboo, there’s something for every site.

About Ornamental Grasses

Generally defined as “a plant with narrow upright leaves growing from the base,” ornamental grasses come in different sizes, shapes, colors and with differing growing requirements. While they may be cut to the ground each year, they are not mowed regularly, and work well as borders, specimen plants or part of coordinated beds. When choosing an ornamental grass for your site, consider the following:

  • Size
    Some beautiful grasses are just inches tall. Others, such as bamboo, grow to 20 feet or even taller. A shorter grass is a perfect edge for a walkway or to border a flowerbed, while a taller grass provides screening or background height.
  • Deciduous or Evergreen
    The winter form of a grass can be very different from its summer form. Evergreen grasses do not die back in the winter, their form remains the same. Winter colors may change and provide interest. Deciduous grasses die back or lean over. Consider the plant’s use when choosing between deciduous and evergreen. If using a grass as a screen, deciduous may not be a good idea.
  • Running or Clumping
    Clumping grasses stay where they planted, and as they grow, the overall plant width increases. However, a running grass sends runners through the ground to grow another grass plant. Sometimes this can be up to 6 feet away. This is advantageous when using the grass as a groundcover or trying to fill in a larger area. Clumping grasses can be divided if they become too large for the site.
  • Color
    Ornamental grasses are available in many colors, including variegated shades with contrasting edges. Additionally, many grass colors change throughout the year. Blues, reds, greens, yellow and variegated shades work well in different situations. A gold or white-hued grass can brighten a dark corner, whereas a dark green grass may be a perfect backdrop for smaller colorful plants.
  • Growing Requirements
    Sun, water, wind and soil requirements vary among grasses. Some require full sun; others grow best in the shade. Some grasses are ideal in rain gardens or wet soils, while others thrive best in drought conditions. Some don’t mind a breezy location, while others need to be more protected. Some prefer a rich, organic soil, while others will look great even in poor soils. And, of course, there are grasses for every range in between.

Before going to the garden center to purchase an ornamental grass, make a list of your requirements. You may want a short grass to line a walkway in full sun with sandy soil. Alternatively, you may need a grass to fill a dry and shady corner. Perhaps you would like to watch a grass clump emerge in the spring, grow to 6′ tall, change colors through the summer and harvest dry seed heads for an autumn arrangement. Choosing the correct grass ensures the beauty of your garden for years to come.